
There are several tasks involved in testing, validating, and delivering documents.
Tasks for verifying test documents can vary, depending on whether you have Exception Manager or not.
Refer to Configuring a Trading Partner, here, for the steps to complete before validation and delivery.
Testing and Validating Documents in Exception Manager
Note: If you do not have Exception Manager, skip this step section
Testing Exception Manager documents can generate alerts that you need to and correct before the documents can be delivered to the ERP system for testing.
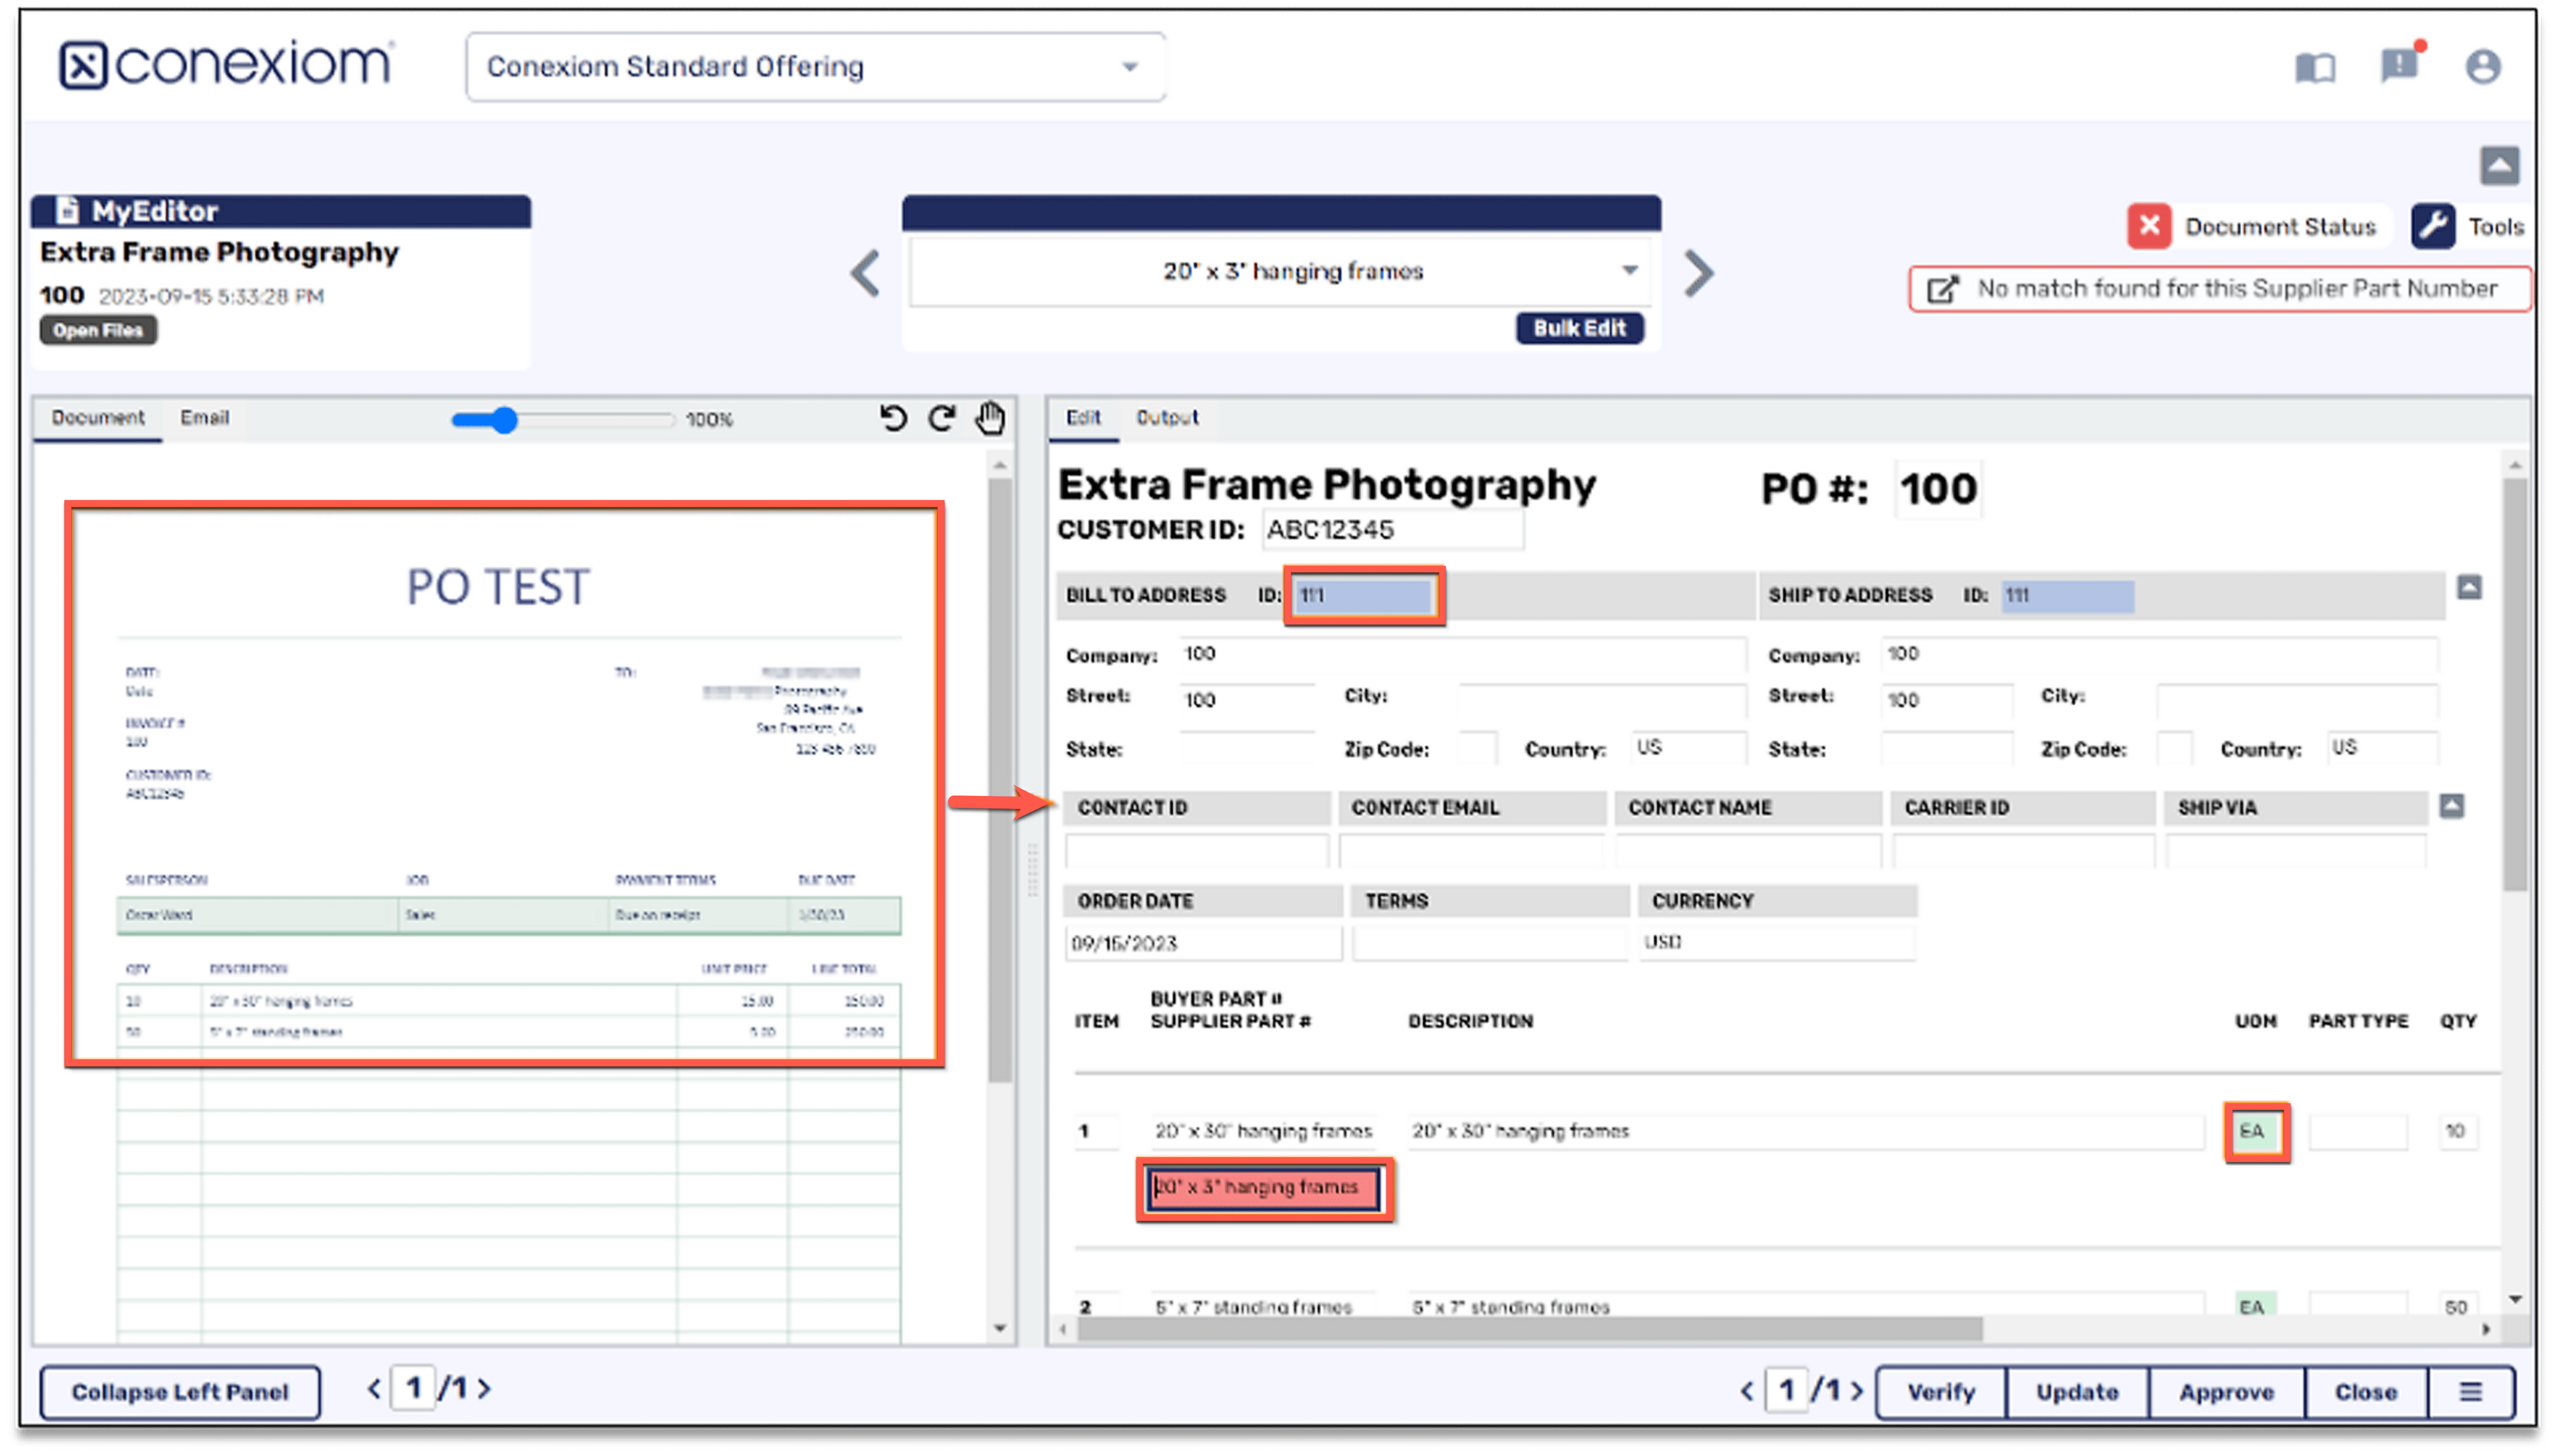
Once opened in the Exception Manager screen, compare the data extracted from the original document on the left to the values in the right-hand side. Evaluate the following:
-
Check data extraction and contextualization. To do so, go through the document line by line and confirm the program has extracted the values you expect.
-
Check that the number of lines accurate.
-
Check that the order of lines being accurate.
-
Check that the document is being split correctly? (if applicable).
-
Check that the data from the original document extracted and contextualized correctly? Check all Header, Footer and Line fields. For example, was the buyer captured.
-
Check that transformations you requested are accurately applied.
Note: Transformations might make the information display differently than how it had originally displayed in the document. For example, if you intended that special characters were to be removed from a part number, they need to display as you intended.
-
-
Check validations. To do so, review the document and evaluate appropriateness of the red, green, and blue fields that indicate validations and errors. If any fields display a validation or an error incorrectly, then check the following:
-
If the document data was properly extracted and contextualized. For example, the wrong address may have been captured as the Ship To Address.
-
Whether your cross-reference table data or ERP data, (depending on data source), is outdated.
Note: Incorrect data in the table or your test ERP system could result in incorrect validations in Conexiom.
-
Approving your Document in Exception Manager
To successfully deliver a document to your ERP, you first need to approve each Exception Manager alert.

When you have verified that the data extractions and validations are correct and that all errors have been fixed, in the menu in the bottom right corner. click Approve. This changes the document status to a “Validation Required” in the Test Documents sub-tab on the Customer Details page. At that point, the document is ready to deliver to your system for further testing.
To download the Quick Reference Card "How to Test and Validate in Exception Manager," click here.
Delivering Test Documents to Your ERP System
When the customer or vendor has been created and Conexiom’s team has applied the initial configurations, you need to test and validate the results in your ERP system.
Follow these steps to deliver test documents for that testing:
-
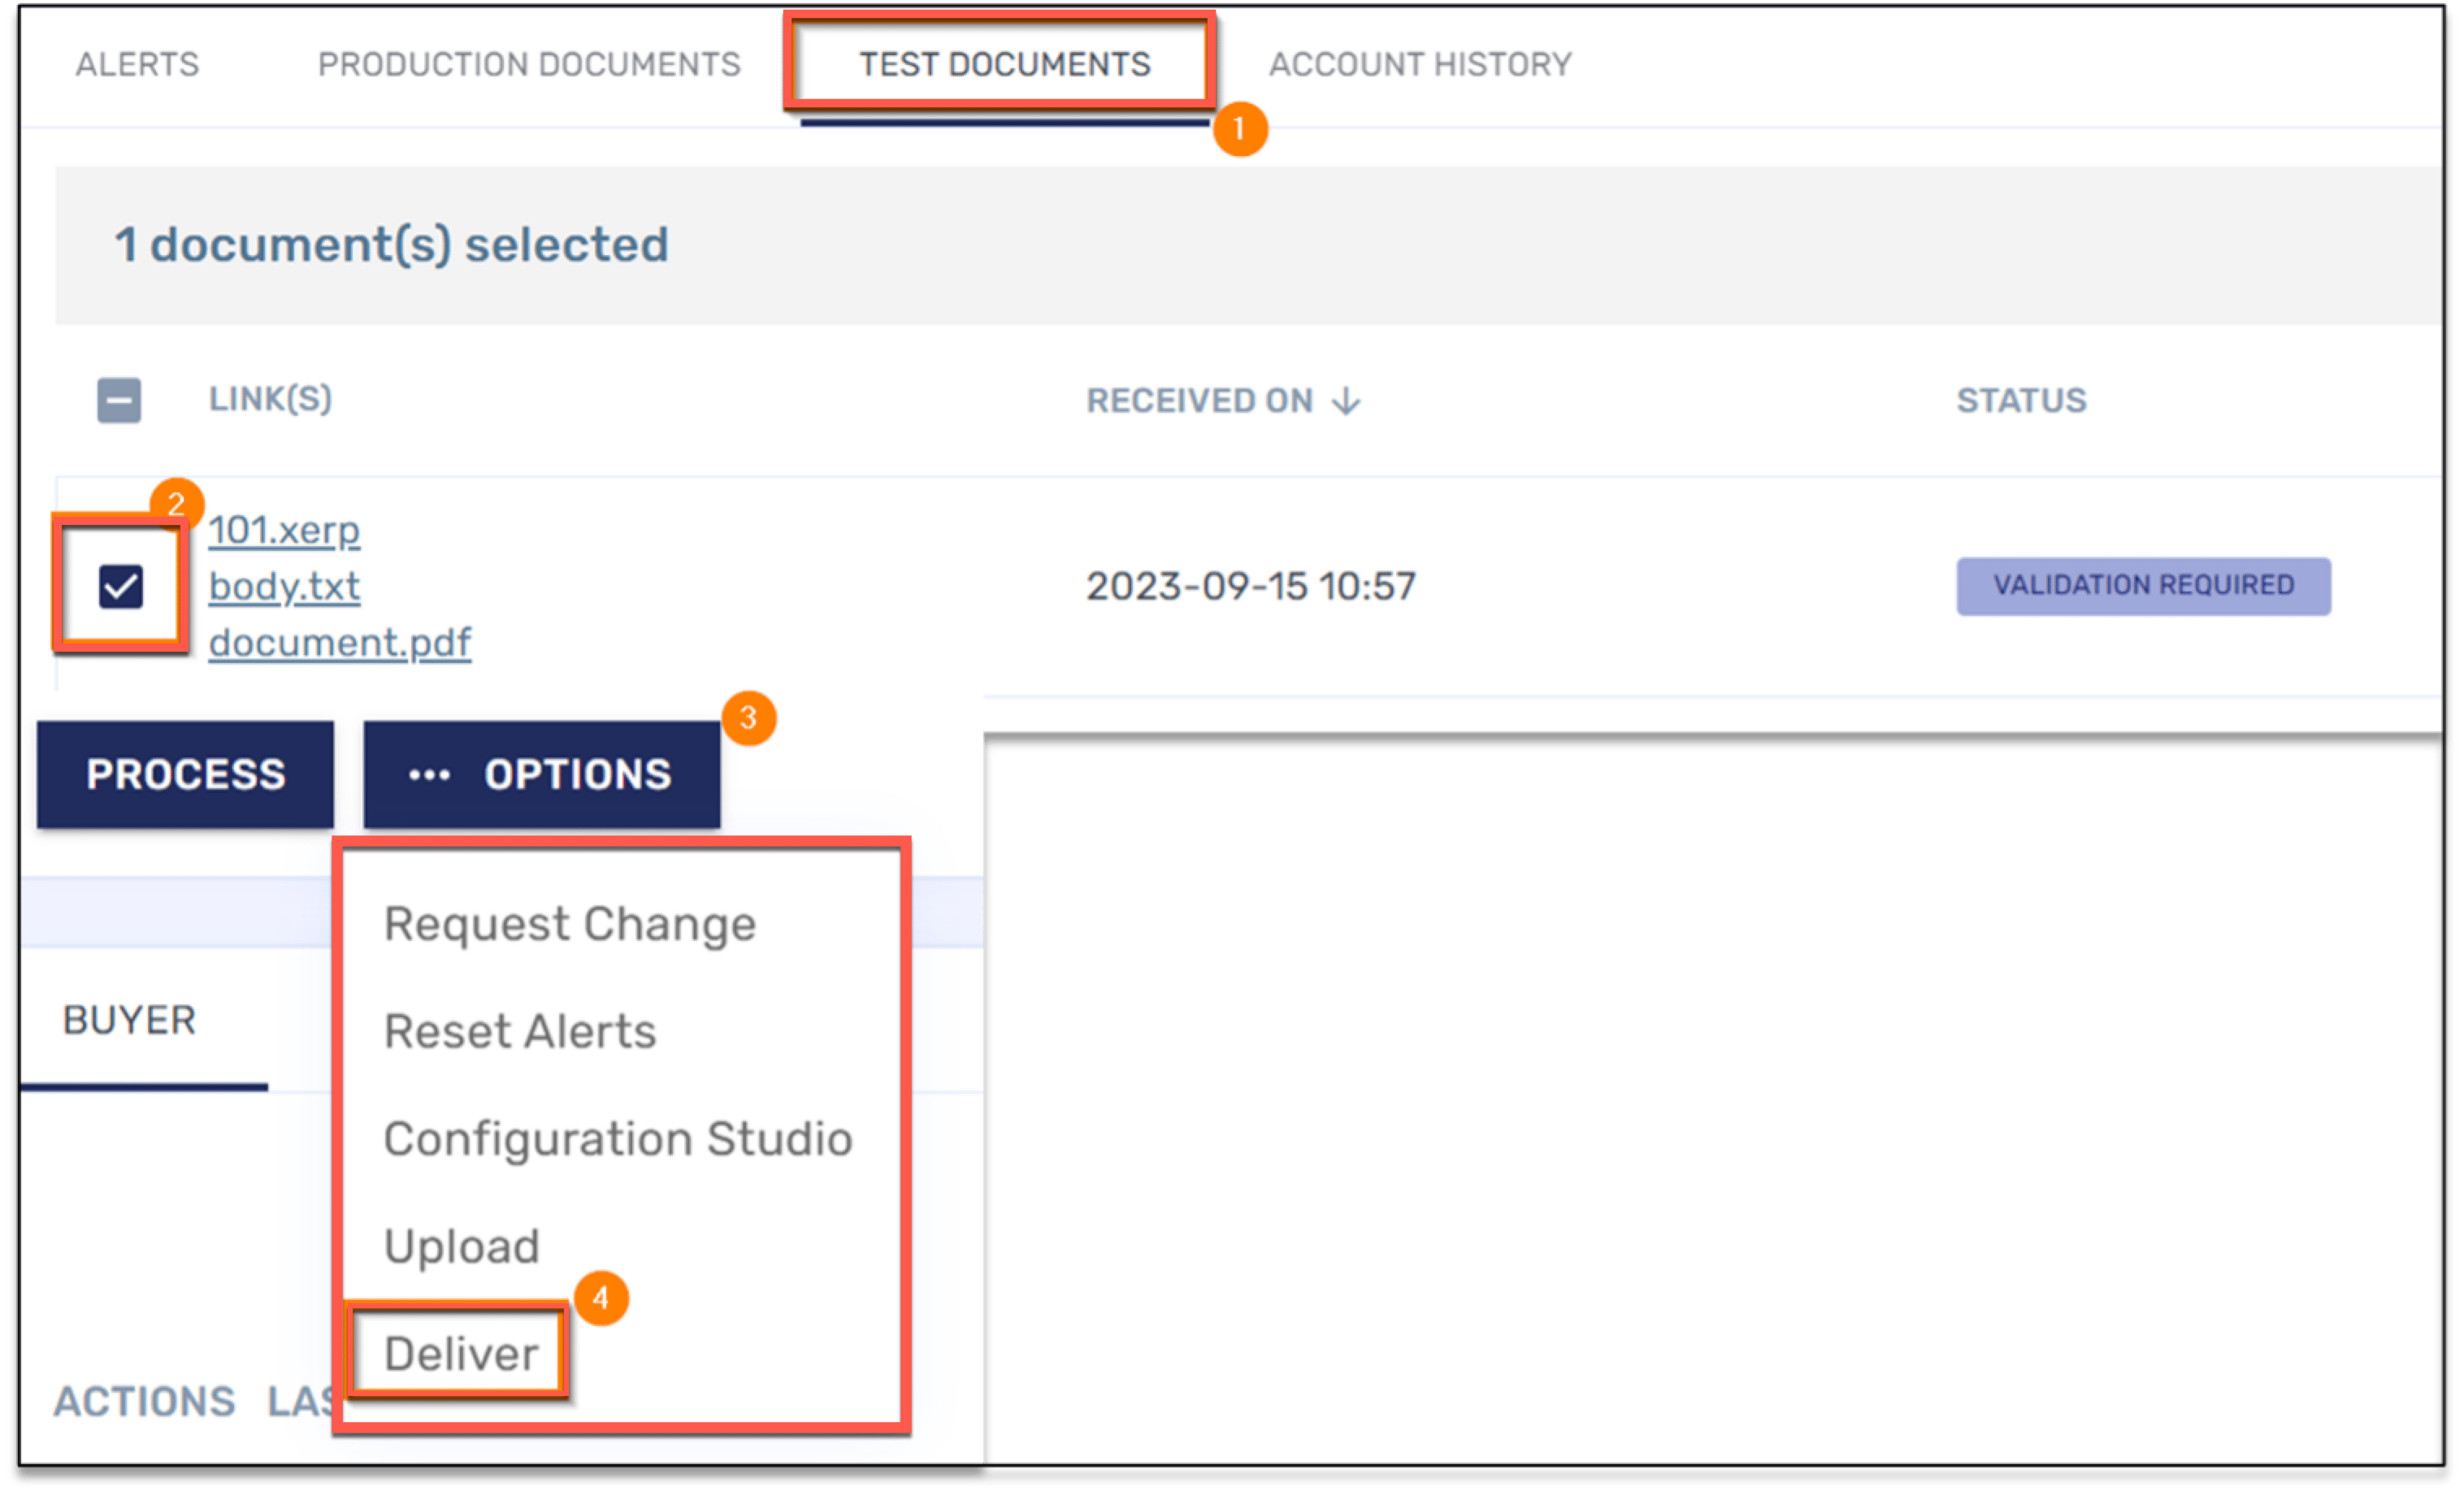
Open the Customer Details page for that trading partner and click the Test Documents sub-tab.
-
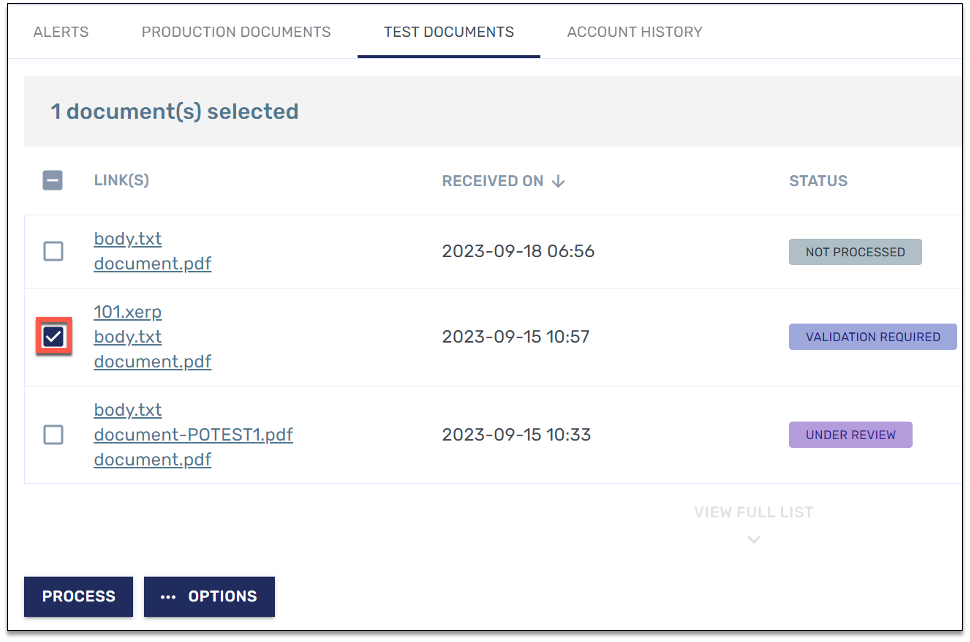
Check each box that corresponds to the documents with the status of "Validation Required."
-
Click Options and from the menu that displays.
-
Select Deliver.
Tips
-
Monitor the change in status as you wait for the system to process the deliveries.
To ensure the latest updates are displayed, refresh your page.
-
Respond to the change in status when it occurs:
-
If the status changes to "Delivered.“ the delivery has been successful.
-
If the status changes to “Not Processed,” the document has encountered issues. When this occurs, see Troubleshooting Document Delivery, directly below.
-
If a document's status shows as 'Delivered' but cannot be found in the ERP system, start by downloading the .xerp file (Conexiom's output file) to identify discrepancies that may be causing delivery issues. See here for instructions to download the file.
If issues persist after following these steps, please escalate to your internal IT team for further assistance. If no issues are identified internally, contact our support team for additional help.
When document delivery is successful, you can test and validate the documents in your ERP system to ensure that data extraction and document configurations meet your expectations. (See Testing & Validating in your ERP System below).
Additional Test Documents
The test documents you deliver will be those that you originally uploaded or emailed in to Conexiom before your Initial Change Request was submitted. For instructions on uploading more documents to test in Conexiom, clear here.
Reprocessing Test Documents
To re-process a test document when it has been processed previously, as, for example, when you have changed a cross-reference table, follow these steps:
-
Select one or more document.
-
Click Process.
Note: To ensure the latest updates are displayed, refresh your page. -
Wait for the system to process the documents and observe any change in status.
-
Respond to the change in status when it occurs:
If the status changes to "Delivered,“ the delivery has been successful.
If the status changes to “Not Processed,” the document has encountered issues. When this occurs, see Troubleshooting Document Delivery, directly below.
Troubleshooting Document Delivery
If document delivery does not work as expected, try these solutions:
-
If the document status is "Not Processed,” first try to reprocess the document as outlined above in Reprocessing Test Documents.
-
If the problem persists, contact your Conexiom team for help.
-
If the status is “Under Review” or an alert status such as “Ship to Alert” instead of “Validation Required,” then a new alert has been generated. Resolve the alert before proceeding with delivery. For instructions on resolving alerts click here.
To download the Quick Reference Card "How to Deliver Test Documents," click here.
Testing and Validating Documents in Your ERP System
When a test document is successfully delivered to your ERP system, it is important to confirm that Conexiom is sending the correct information in the correct fields. Follow the steps below for best practices when testing documents in your ERP system.
Testing information that was sent in an output file is normally reviewed in your ERP system, within your regular working screens. However, you can review the output file directly or use another method to view the information.
Testing the Output File
As you review the file, make sure that all fields are populated, that there are no missing or empty spaces where there should not be, and that populated values reflect the changes, updates, and logic that that you expect.
-
Check data accuracy in the following:
-
The header populated correctly, showing the correct fields and the correct information within each field.
-
Each line item holds the expected information and that each is accurate.
-
The footer holds the correct fields and the information displays accurately.
-
-
Check the data transformations and rules:
-
Transformations and look-ups were applied and sent as expected.
-
The document displays as if you had typed it manually.
-
Use Conexiom’s output file (.xerp) to review what has been mapped on our end and identify any inconsistencies between our system and yours. This can help ensure alignment and address any discrepancies. For more information on downloading .xerp files, click here.
Troubleshooting Issues
If you encounter any issues, follow these steps:
-
Review all documents and alerts for potential problems. Take note of the issue seen including the document number and line number.
-
When you have reviewed all of the documents, submit solutions to the issues you have found in a change request, sending one change request for all of the needed changes. See Guidelines for Submitting a Change Request.
-
For assistance, contact your Conexiom Representative.
When you have requested changes, if there are problems, then alerts will again be generated. Resolve them before sending the documents to your ERP system again. If needed, repeat the entire process outlined above. If the problem persists, contact your Conexiom team.
-
Click here to download the Quick Reference Card "How to Test and Validate in your ERP" .
Next Steps
If everything looks as expected and no further changes are needed, you can proceed to move to production.