
The feature Advanced Boundaries allows you to define or modify custom field areas and section-area mapping for data extraction on documents—even dynamic, non-fixed areas where data blocks can vary.
Overview
In setting up document templates, you can define or modify data extraction areas. This may be especially useful when you need to define areas for data extraction that have dynamic—flexible—definitions. That is, these areas can adapt when the size of data blocks vary. The ability to adapt in this way is normally beyond the scope of fixed-coordinate mapping because of the shifting size of the area.
These features can apply within multiple documents when the same data block varies, or they can apply within one document, as when the length of line-item descriptions vary on different rows. For example, in a list of line items, the field for Part Description on the first row might require three lines, but on the second row, it might require four lines. The same applies between two or more documents: in one document the first row in a list of line items might require three lines but in another document, the first row might require some other number of lines. This holds true whether line items or information blocks within the header or footer of a document.
How Advanced Boundaries Works
Instead of a specific definition for a box or vertical point, with the Advanced Boundaries you can define the boundary limits of an area, giving the extraction engine a simple rule to follow instead. For example, you can set a rule that tells the system to extract all of the data starting from the Header section down until it encounters the field labelled “Buyer.” You can also set the amount of space to a type of data block numerically.
Creating areas and sections this way ensures that the extraction engine captures all of the correct data, regardless of how much text lies within the required data blocks.
Using Advanced Boundaries to Setup Field and Section Definitions
When setting up a document template for working with varying amounts of data, you can apply two different feature sets: one for modifying field areas and one for modifying section maps.
-
Field Areas allows the you to accurately define the boundaries within the header and footer.
-
Section Mapping is designed for defining the size of rows for line items.
Note: These procedures apply only to fields that have already been defined, either separately or as a group. For more information on defining fields, click here.
Modifying Field Areas with Advanced Boundaries
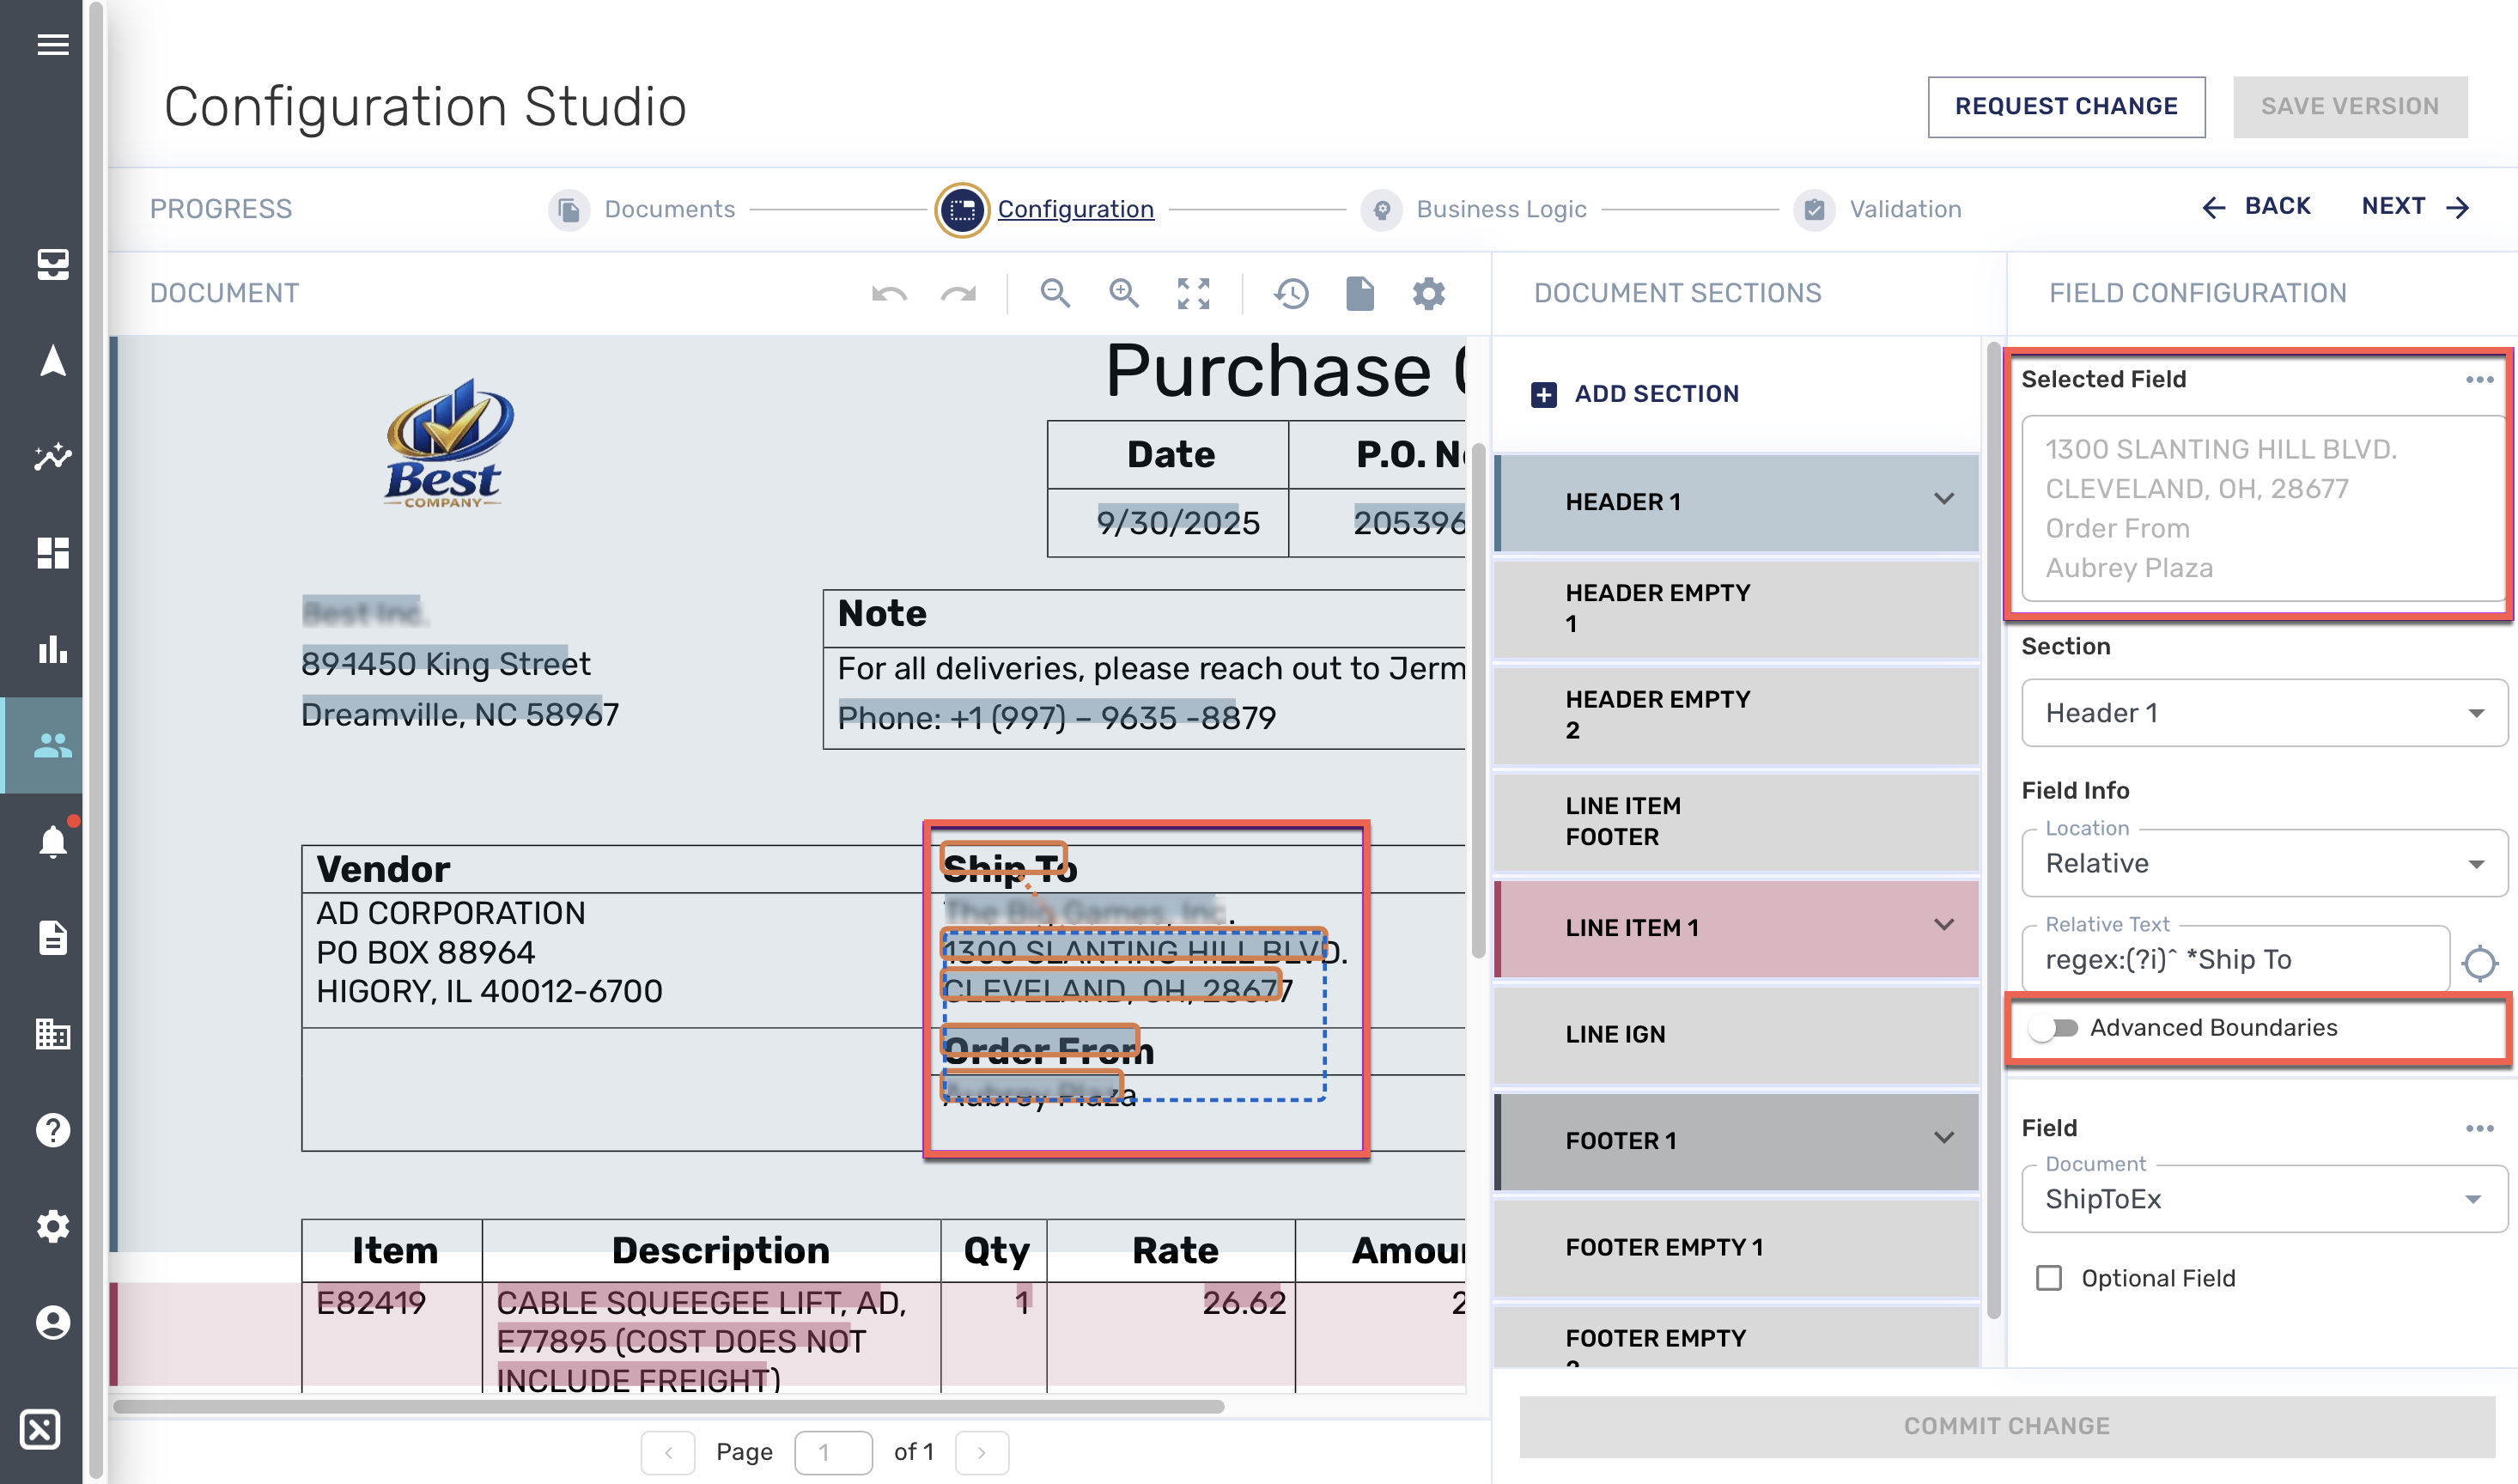
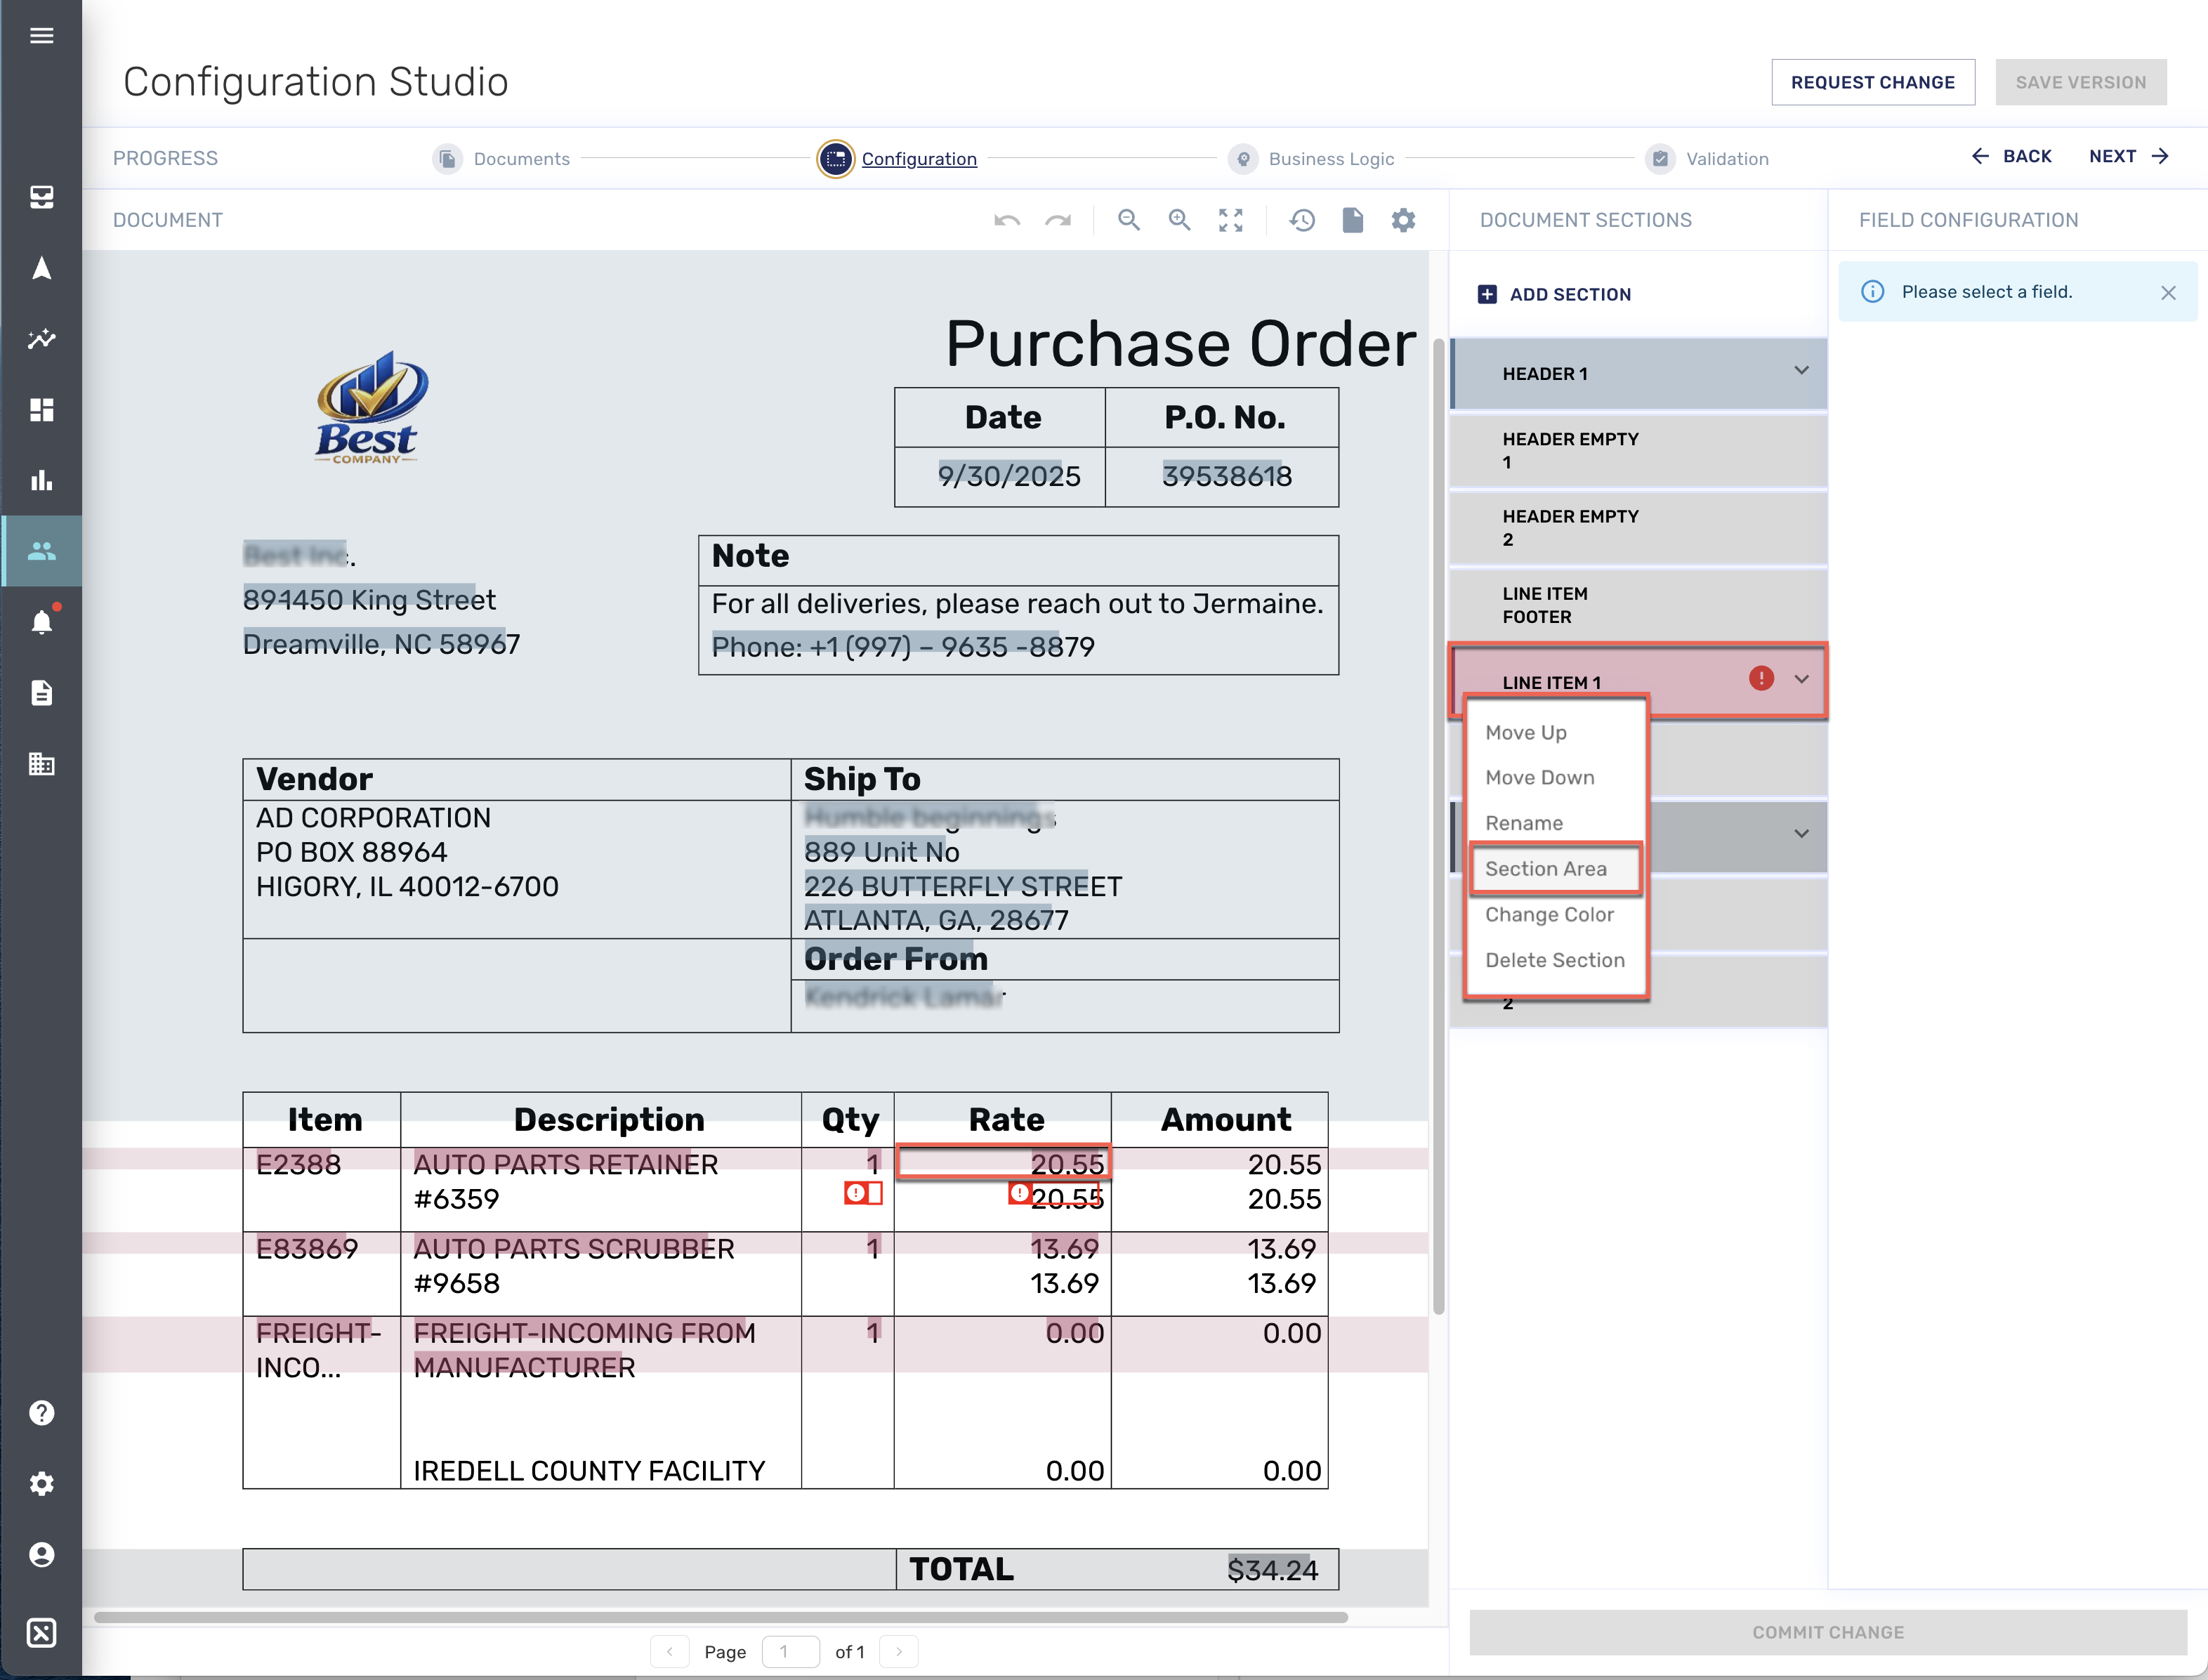
When the definition for an area needs to be modified because it is capturing too much or too little information, change the definition of the area using Advanced Boundaries. An example is shown in the following image where the Ship To address is capturing too much information. From the dotted, blue line, the selection box, that designates the area, you can see that it includes the heading “Order From” and information below it. In this case, creating a boundary at the end of the address, before Order From, would eliminate the mistaken information capture.
To create modify field boundaries in order to extract the right information when the size of the field may change, follow these instructions:
-
Click the defined (highlighted) field or group of fields that you want to modify. (If a field is part of a group, all associated fields will highlight). A dotted, blue line surrounds your selection. In the Field Configuration panel on the right side of your screen, your selection is listed in Selected Field. In the example above, the extra information, “Order From” and the fictitious contact name is included.
Note: The fields you work with must already be defined, which is designated by the system highlighting or darkening. For more information on defining fields, click here. -
In the panel on the right side of your screen, click to toggle switch to turn on Advanced Boundaries. The Advanced-Boundaries feature set displays in the right panel.
-
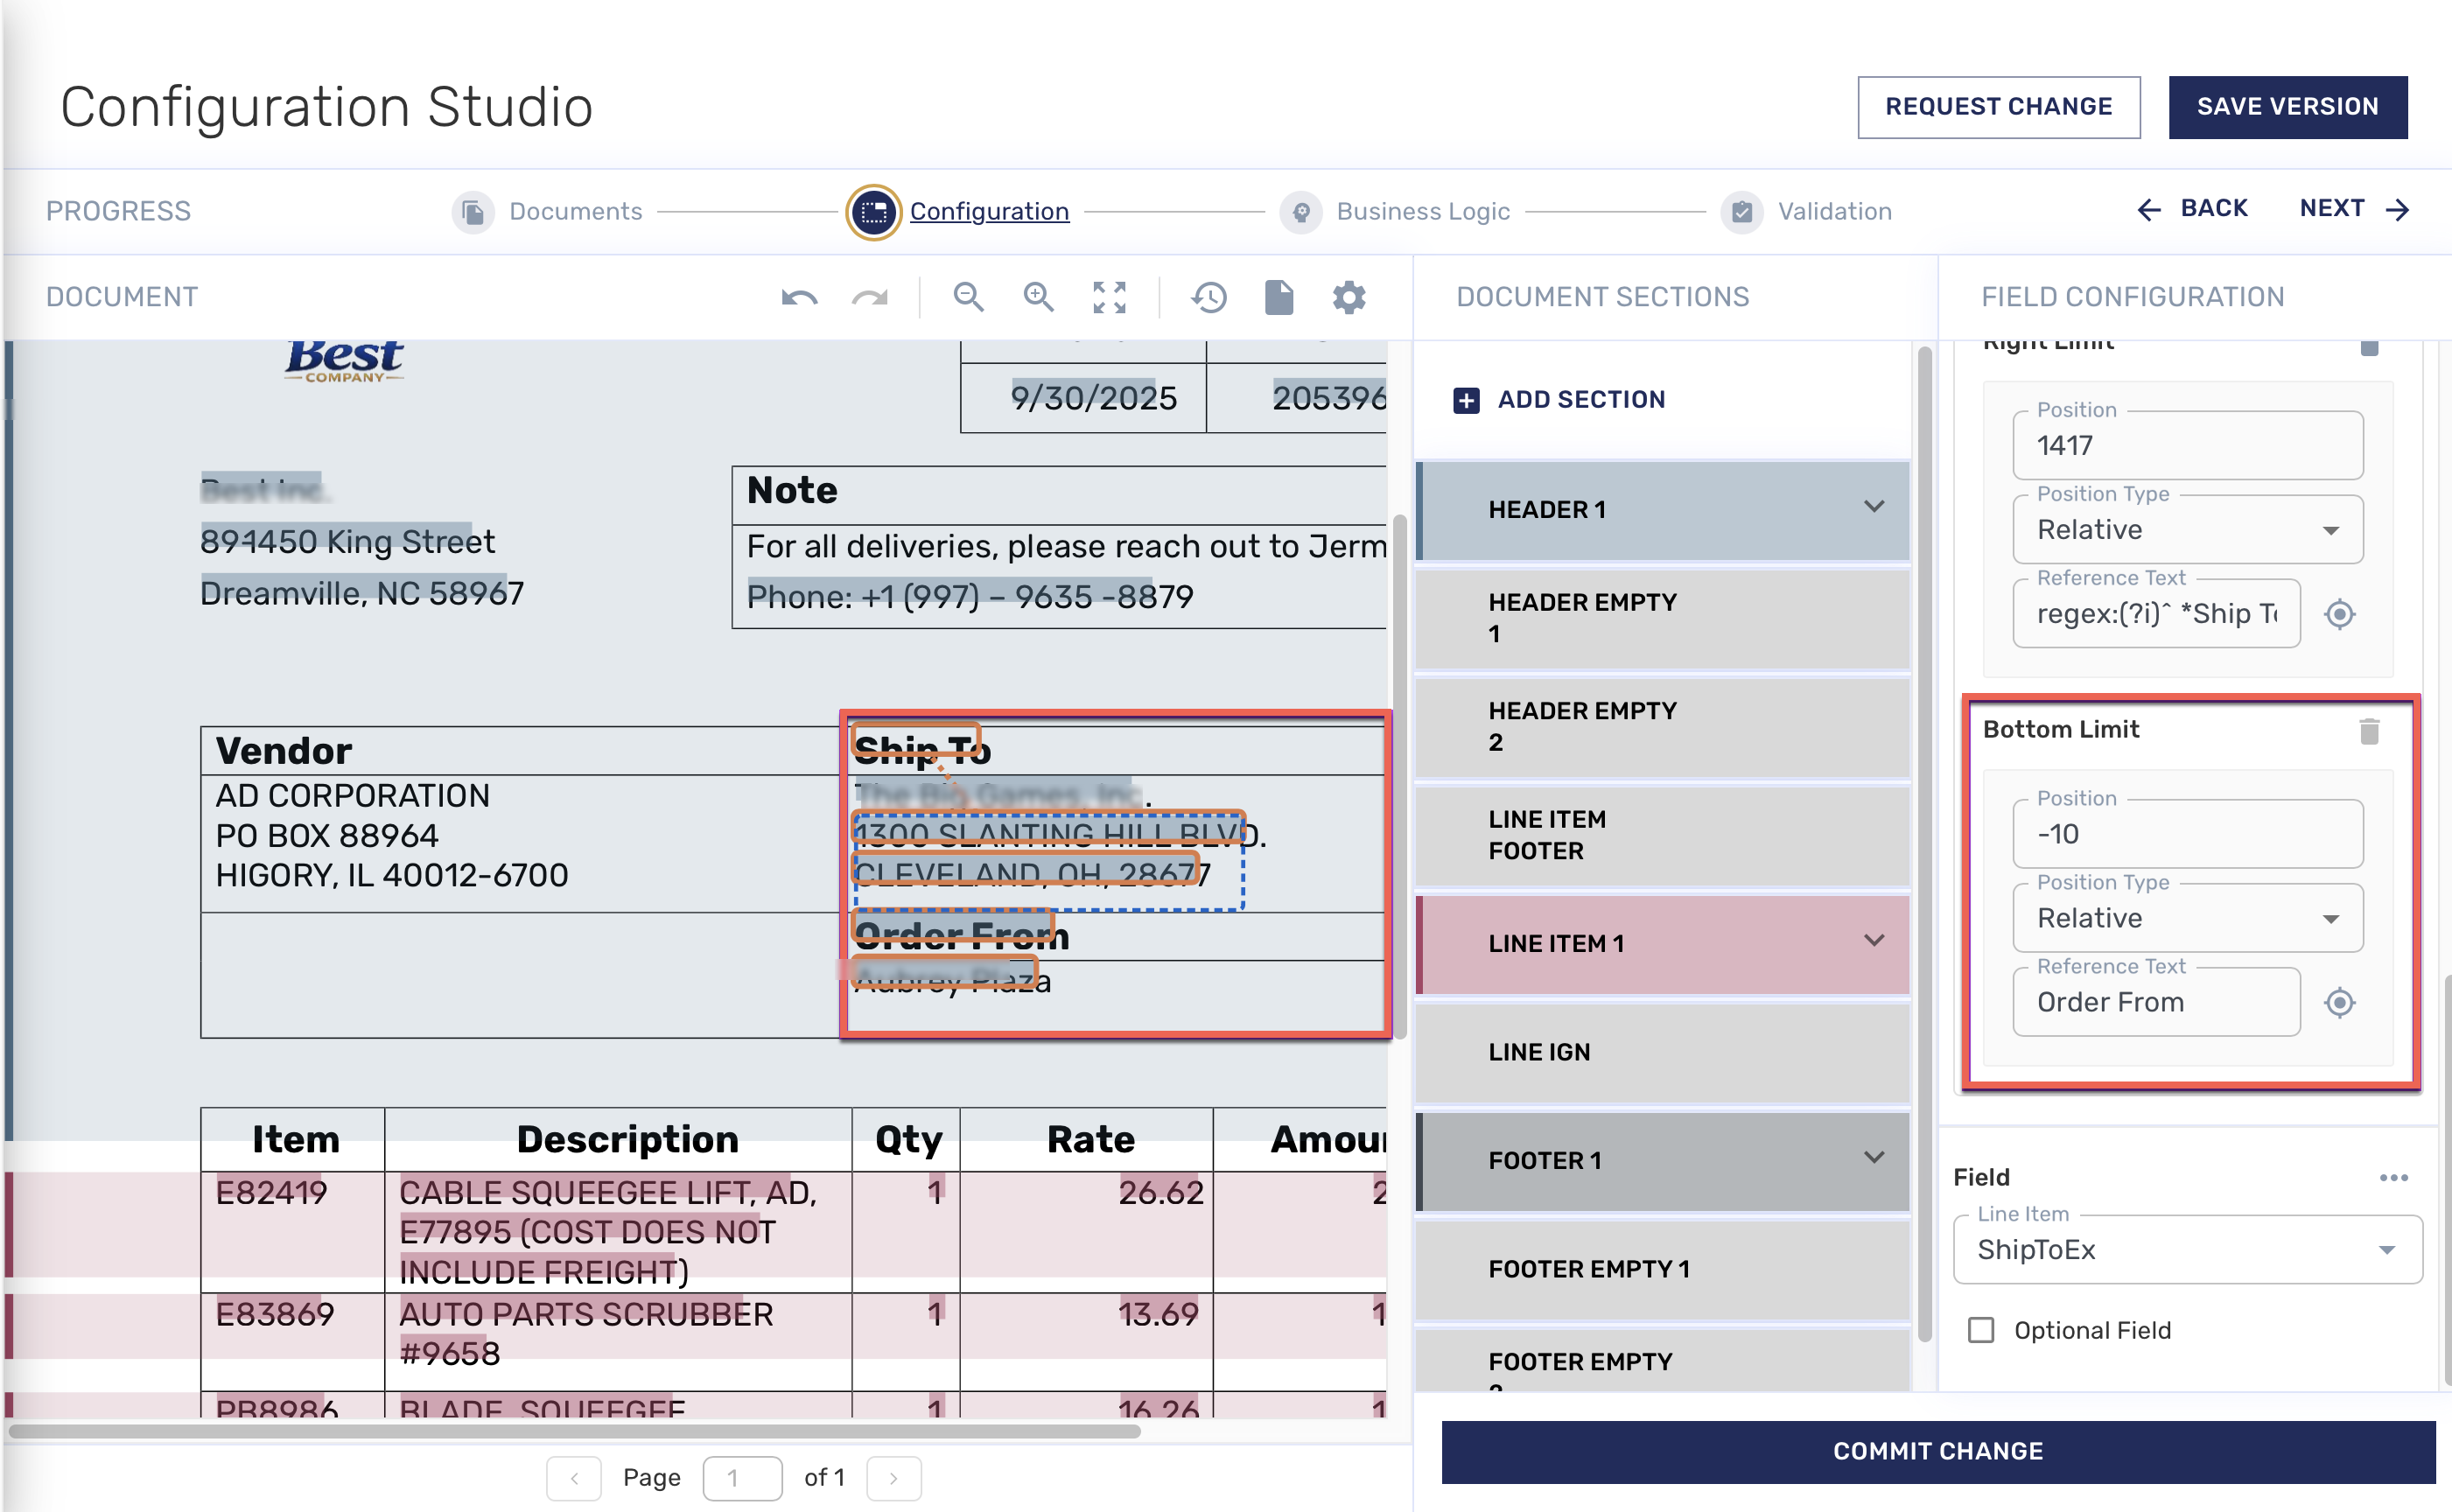
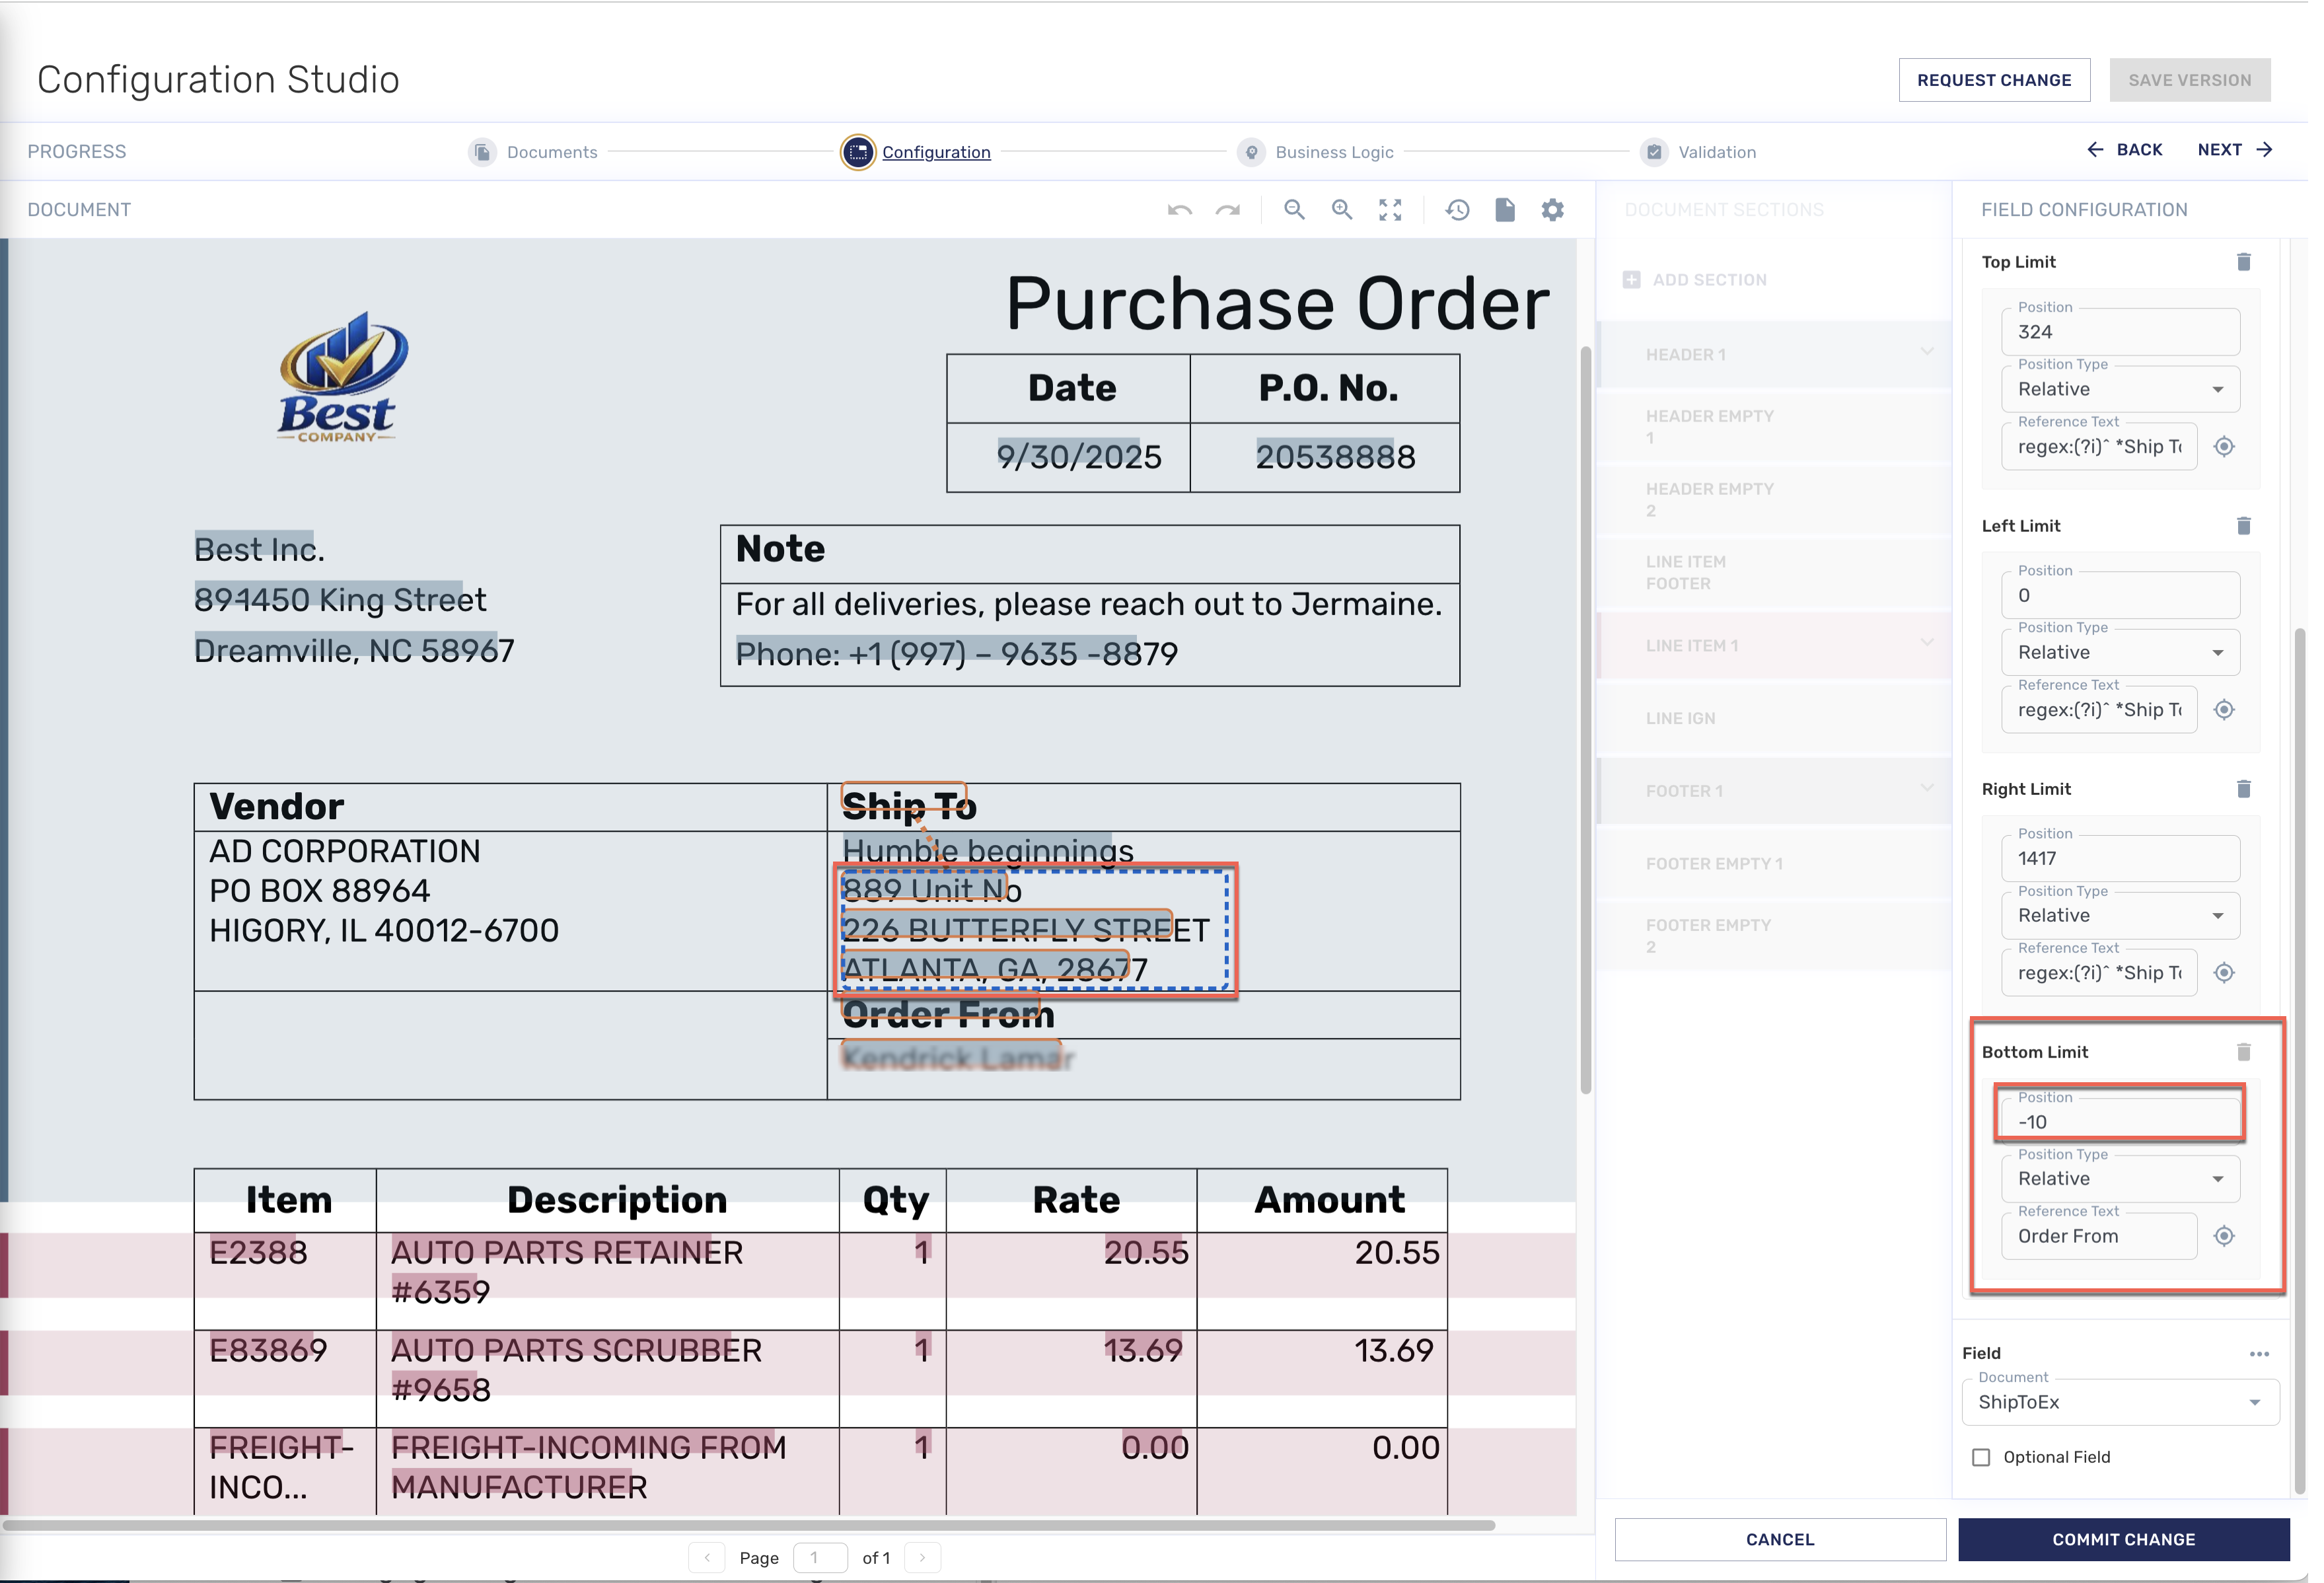
In the panel, set a Limit. For example, set the Bottom Limit. This identifies that you are going to define where the bottom of the selection box and data capture will stop. To do so, click the Position Type field and from the dropdown menu that displays, make. a selection. For example, select Relative. This means that the selection box will be anchored in relation to something you choose, (see Step 6, directly below).
-
Ignore the Position field momentarily and first click the Identification icon
-
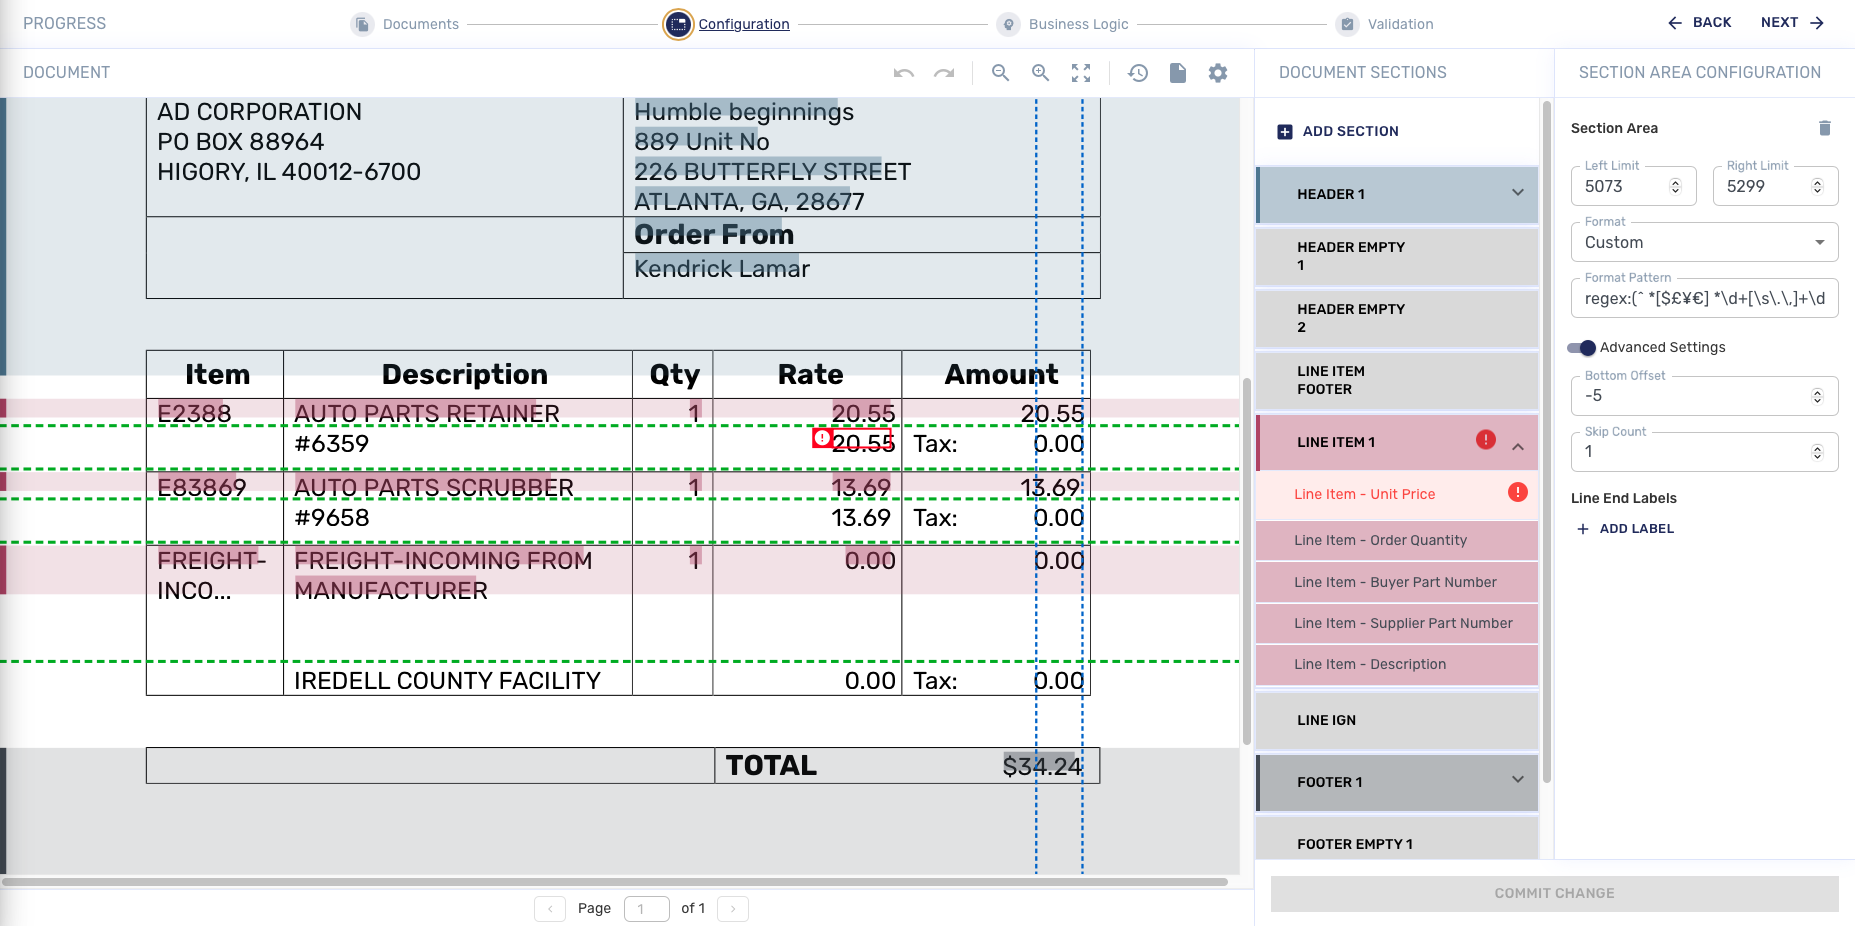
Click the Position field and enter a number that will set the number of pixels to lie above the bottom boundary and act like a margin outside the selection box. For example, enter -10. This means that there will be a ten pixel margin outside the boundary, between the selection box and the Order-From text string. When you enter a number, you can see the dotted, blue line of the selection box change to the new position. You can change the number as many times as you want up until you commit the change.
-
When you are satisfied with the modifications you have made, at the bottom of the screen, click Commit Change.
-
Test your changes. (See Testing a Document for Validation, directly below).
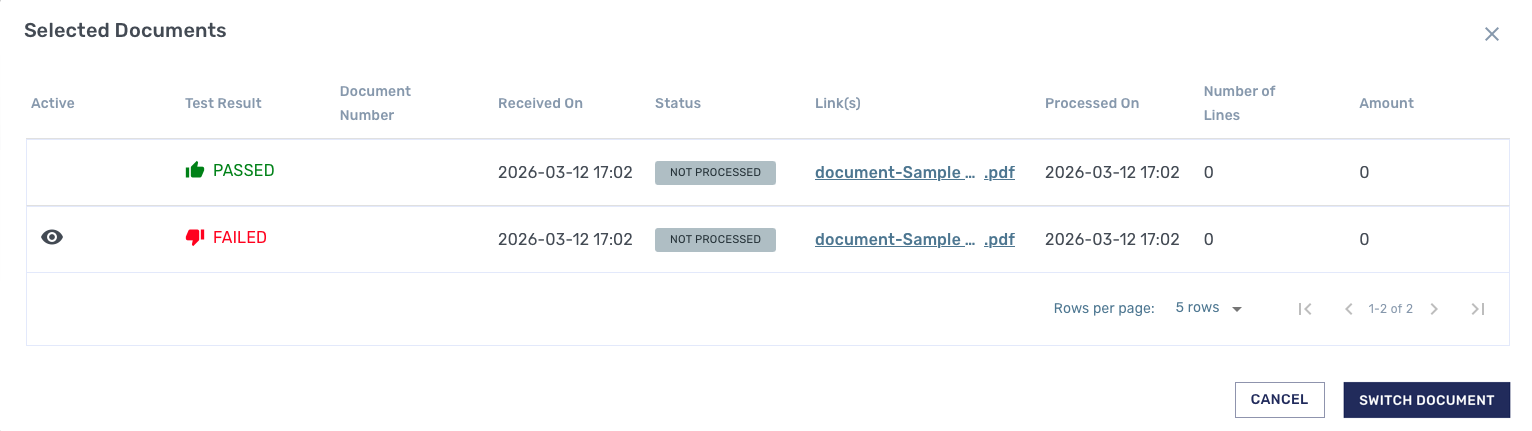
Testing a Document for Validation
It’s important to check for errors at each point of the document-modification process. After making changes, you can test the document to see if it will pass validation. Follow these steps:
-
Click the Document icon (

-
If a document shows that it fails, displaying a Failed icon, click the Active column in the corresponding row. The icon moves to the new row.
-
Click Switch Documents so that you can troubleshoot the problem. The document you selected displays in place of the previous one.
Setting Up a Section Map with Advanced Boundaries
When you have a situation where line items can vary in size, use the Section Map feature, (The Field Areas feature set works with headers or footers). As an example, in the image below, the rows of the line-item table are of varying height because the descriptions of items are of varying length. The problem registers an error under the the columns labelled QTY and Rate.
This is a situation that influences the height of every column. Because of the various lengths of descriptions, (or heights of the rows), it’s not possible to give a single definition for what the extraction engine should capture: you need to increase the space to accommodate the size of each of the rows, no matter how many lines of text each row holds.
To change the size of the rows and address the problem, follow these steps:
-
Because the error is in the first line item, in the panel on the right side, click Edit (pen) icon just to the left of the words “Line Item 1.” A dropdown menu displays.
-
From the menu, select Section Area. Another panel displays on the right that lists Section Area options. Above the document itself, various horizontal and vertical lines display.
-
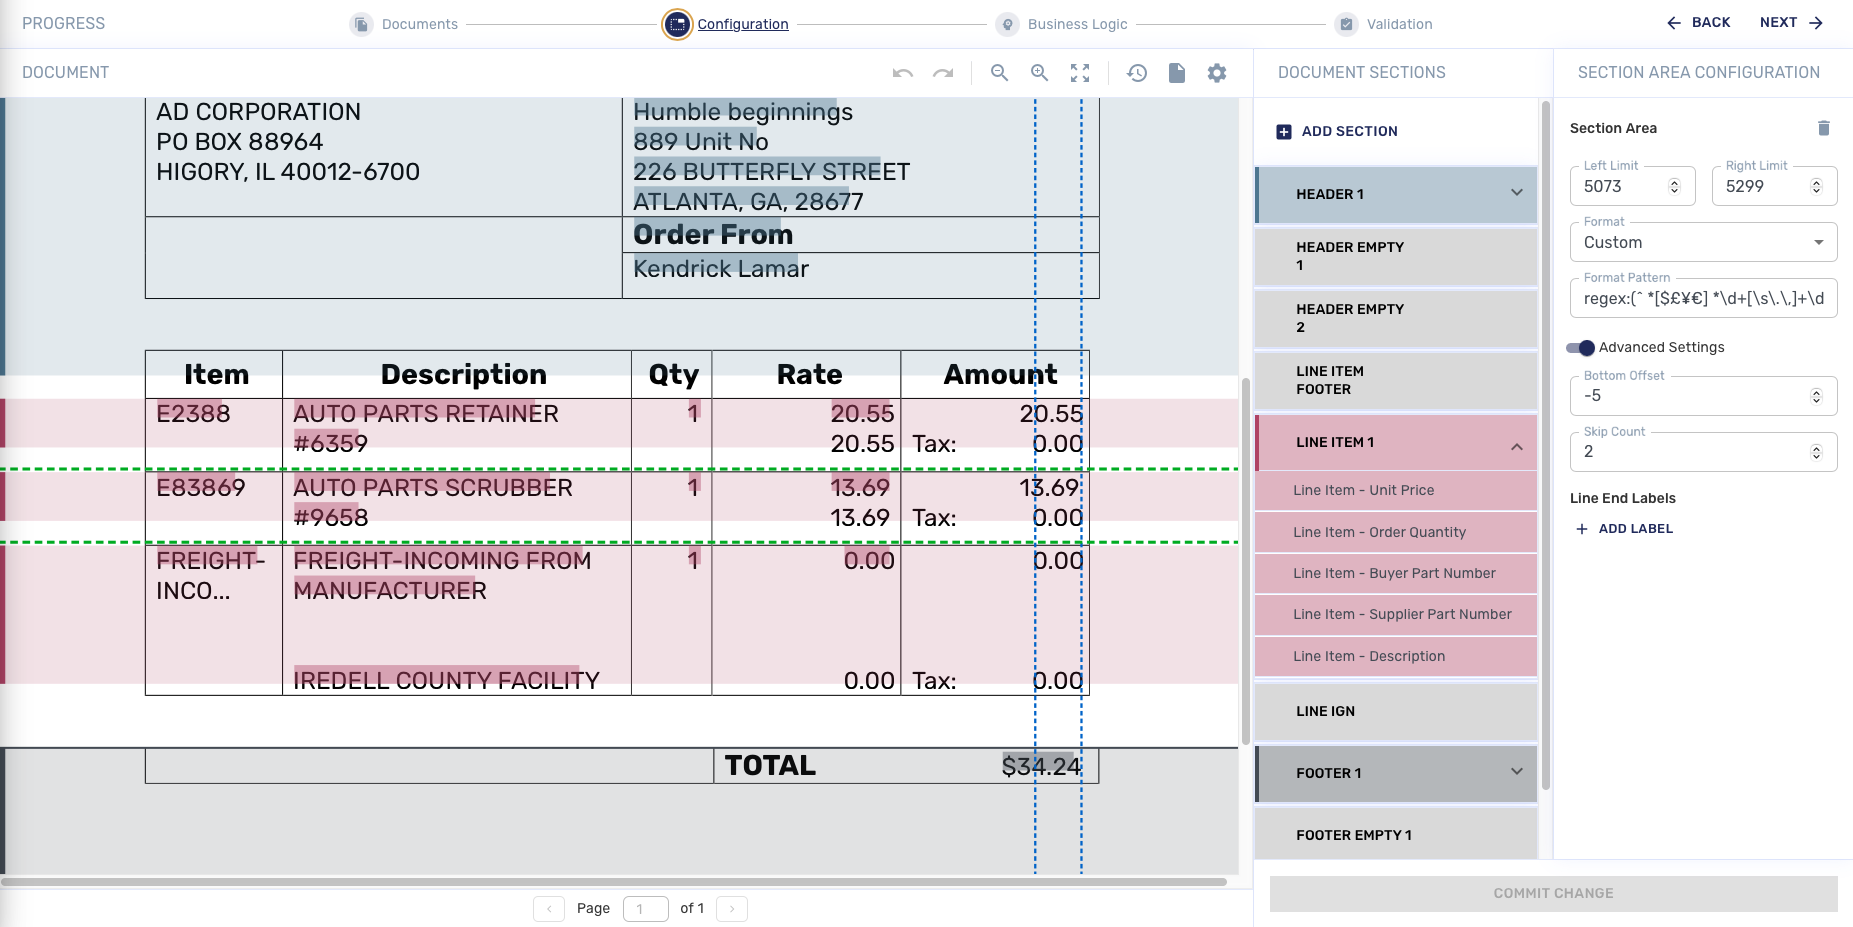
Diagnose the issue by asking whether there are enough lines allotted in the definition of the line item. In the example, as indicated by the dotted, green, horizontal area-selection lines above Line Items section, you can see that only one line is allotted for the height of the row, because only one is highlighted. In this case, apparently two lines are required.
-
On the panel for Section Area on the right, the definition for the number of rows is controlled by the Skip Count field, which in the example is set at the number 1. To manage the number of rows for each line item, click the directional arrows next to the Skip Count field. In the example, click the Up-Arrow next to Skip Count to change it to the number 2. As a result, the number of rows included increases and the error is resolved.
-
Click Commit Change to apply the update.
-
Test your changes. (See Testing a Document for Validation, above).