
Splitting Fields is is the process taking the information in one field and dividing it into multiple fields.
Splitting Fields to Change Field Definitions
There are many reasons you may want to split field definitions. Here are some examples:
-
Text Selection: At times the results that are captured by the AI include more text in a field than you want in a field. For example, in listings for Part Numbers, along with the Part Number itself, the written description of the part may also be captured. In a case like this, you would isolate the Part Number, splitting it off from the description, so that the Part Numbers column of the Listings Table reads correctly.
-
Add Definitions: You may want to add more definitions to the same field. For example, you may want to divide the Ship To Address in order to separate the street, the city, the state, and the postal code and then, further, add a hyphen between the state and the postal code.
-
Customize: You can also combine or restructure information in a needed way. For example, if an ERP only accepts telephone numbers without hyphens, you can split the hyphens out of the document’s data in a phone-number field and then restructure the phone numbers from three groups of numbers to one group of numbers.
There is no limit to the number times you can split a field definition.
To split a field definition for modification, follow these steps
-
Locate the field definition by doing one of the following:
-
Click the arrow in the upper right corner of the correct tab in the right panel and from the menu, select the correct field. The field definition opens.
-
Click the field on the document preview. The field definition opens.
(Also see Viewing Field Configuration Definitions).
-
-
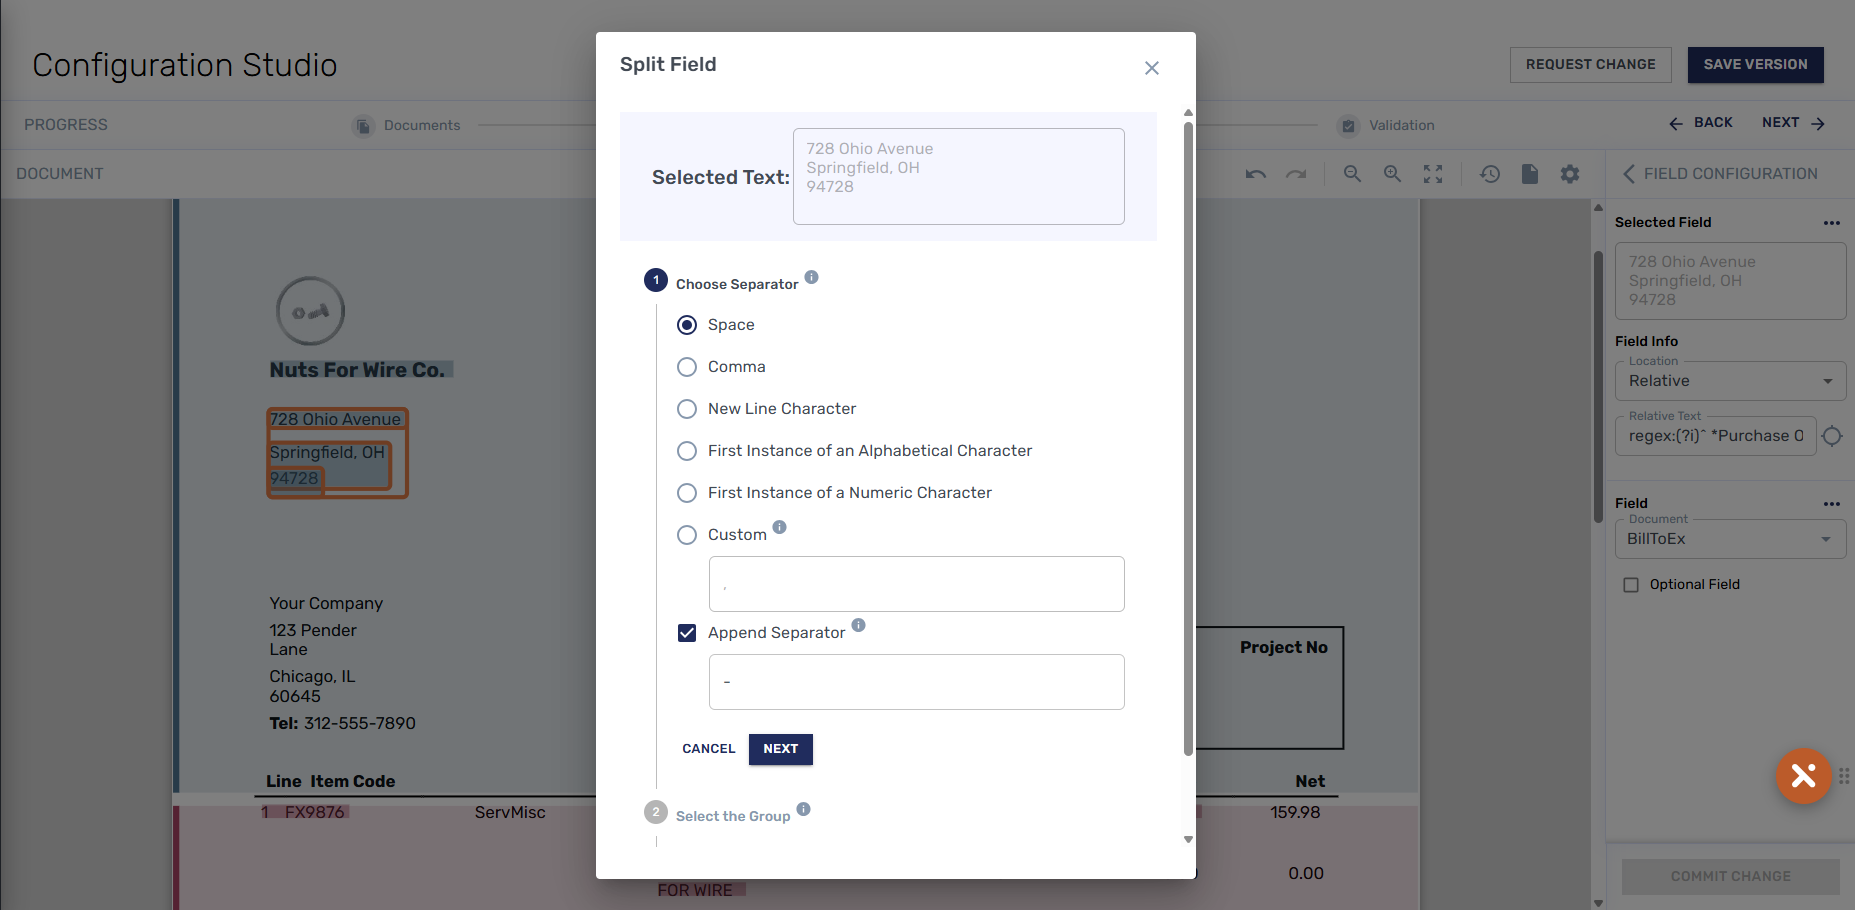
Click the three dots (ellipses) from the lower part of the panel, (not next to Selected Field in the upper part of the panel), and from the menu that displays, click New Split Field. The Split Field dialog box displays.
-
Choose a separator from the Separator List. For example, if your selected text is an address and you want to split its component groups by using the new line break, click the radio button for New Line Character and click Next. When the dialog box changes you will see the components of the address broken into components by the spaces within it.
Note: You can also create a custom separator by selecting the Custom radio button. In the dialog box, enter a word, punctuation mark, or any consistent character that isn't already listed. This option is also useful if you want to use multiple separators. For example, you could enter both a new line character and a comma, allowing the system to use both to define the groups that follow. -
Click the Append radio button if you want to add a character to the separator that you have already selected. This will add that character between all the groups that you select in the next step.
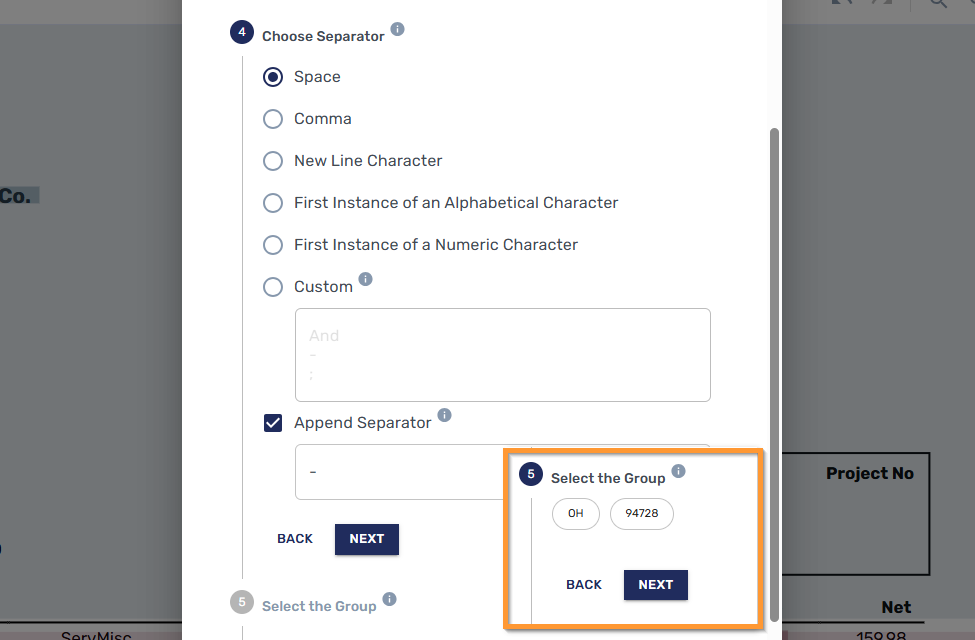
For example, if you had an address in which you wanted to put a hyphen between the State and Postal Code, to change “OH 94728” to "OH-94728,” do the following:-
Click the separator Space. That breaks up the selected text into groups by the spaces.
-
Check the box for Append Separator and in the dialog box beneath it, enter a hyphen, (-).
-
Click Next. The components of the address are broken into components by the spaces within it.
-
-
Choose the groups to which you want the appended character to apply. Using the example above, (Step 4), choose the State and the Postal Code to add a hyphen between “OH” and “94728.” Doing so produces “OH-94728.”
-
Click Next. The dialog box changes again.
To modify your changes, click Back. -
The result from your actions in Steps 3-6 displays in the Result field of the dialog box.
-
Click Confirm to submit the split you defined.
-
If you originally chose a field with one definition, after splitting the field is recorded as having two definitions, above the Document Field, “Definition ½” displays. Click the Right Arrow or Left Arrow to move between the definitions.
-
Define the new field definition you split from the other information.
-
Consider whether to change the definition of the information that was not split off. To do so, make changes by selecting options, as outlined in Making Simple Changes to Field Definitions).
-
Consider whether to delete the information that was not split off. For example, click Definition 1 and then click the Three Dots (Ellipses) and from that menu, select Delete.
-
-
If the field needs to be split off further for more definition, select the same field and follow the process again .
For example, if you have a part number like “PN: 12345, XYZ” and you initially used the Split Field feature to remove the extra text after the comma (“XYZ”), you may still need to use the feature again to remove the “PN: ” before the number.
Note: There is no limit to the number of definitions, so numbers may vary. For example, if you split the field three times, the display will read Definition 1/3. -
Click Commit Change.
-
If all your changes are complete, follow the standard procedure for saving changes. (See Saving and Validating Changes).
Adding Field Definitions in a Split Field
To add a definition in a split field, follow these steps:
-
Locate the field definition. (See this article for more details).
-
Click the three dots (ellipses) and from the menu that displays, click Add Definition.
-
From the dropdown menu, select a new definition. If you selected a date, a new field displays that provides a menu from which to select a Date Format, such as MM/DD/YYYY.
-
Click the field to select the format.
-
-
Click Commit Change.
-
If all your changes are complete, follow the standard procedure for saving changes. (See Saving and Validating Changes).
Deleting Definitions in a Split Field
To delete a definition in a split field, follow these steps:
-
Locate the field definition. (See Viewing Field Configuration Definitions).
-
Click the three dots (ellipses) and from the menu that displays, click Delete Definition. The field is deleted.
-
Click Commit Change.
-
If all your changes are complete, follow the standard procedure for saving changes. (See Saving and Validating Changes).