
The sections that were created in Configuration Studio can be customized to suit your needs in terms of order, name, color and size.
Modifying Existing Sections
Use the links below to view instructions on the different ways to customize sections in Configuration Studio.
Changing the Order of Section Listings
The order of sections determines the program’s execution order, so you may want to move a listing up or down in the Document Sections panel, on the right side of your screen.
You can change the order within a section type. For example, you could have three different purchase orders that are identical, except that the description field is different in each.
In that case, you would need a Line-Item definition for each document variation. You could change the order or the Line Items, but you could not put the Line Items ahead of the Header sections.
If you knew the document variation defined by Line Item 2 was much more frequent than the variation in Line Item 1, however, you could move Line Item 2 in front of Line Item 1. This would direct the program’s AI to search for the Line Item 2 definition first, making the processing of documents more efficient.
To change the order of sections, follow these steps:
-
Hover your cursor above the left side of a section’s listing until the Edit icon displays.
-
Click the Edit The section highlights and a drop-down menu displays.
-
From the menu, click Move Up or Move Down. The section listing moves according to your selection.
-
Click Commit Change.
If all your changes are complete, follow the standard procedure for saving changes. (See Saving and Validating Changes).
Renaming Sections
If you want to rename a section to give it a better description than the current name, you can change it. To rename a section, follow these steps:
-
Hover your cursor above the left side of a section’s listing until the Edit icon displays.
-
Click the Edit The section highlights and a drop-down menu displays.
-
From the menu, click Rename. A dialog box displays that allows you to enter a new name.
-
Click Commit Change.
-
If all your changes are complete, follow the standard procedure for saving changes. (See Saving and Validating Changes).
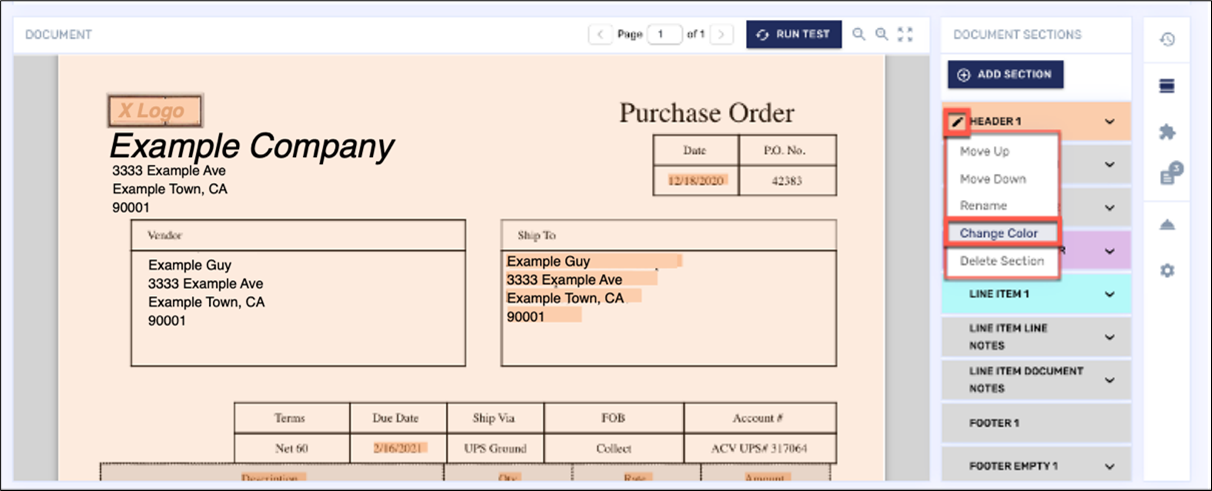
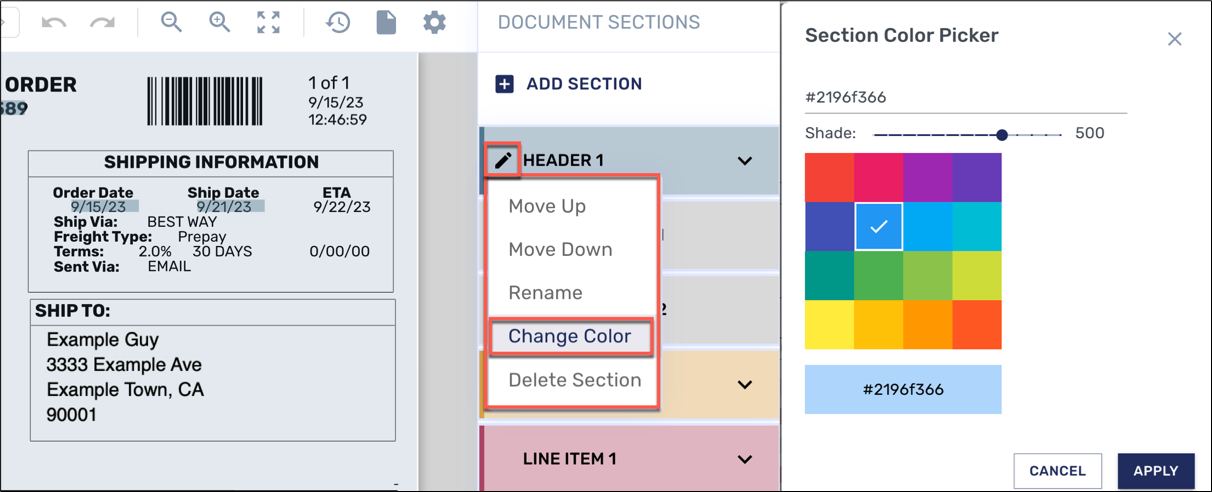
Changing Colors of a Selection
If you want to change the color of a section, you to that. To change colors of a selection, follow these steps:
-
Hover your cursor above the left side of a section’s listing until the Edit icon displays.
-
Click the Edit The section highlights and a drop-down menu displays.
-
From the menu, click Change Color. The Color Picker dialog box displays.
-
Click your choice of color. To make the shade of the color more or less intense (more or less transparent), click the dot within the Shade slide-control above the selection box.
-
Click Commit Change.
-
If all your changes are complete, follow the standard procedure for saving changes. (See Saving and Validating Changes).
Deleting a Section
To delete a section, follow these steps:
-
Hover your cursor above the left side of a section’s listing until the Edit icon displays.
-
Click the Edit The section highlights and a drop-down menu displays.
-
From the menu, click Delete Section. The section is deleted.
-
Click Commit Change.
-
If all your changes are complete, follow the standard procedure for saving changes. (See Saving and Validating Changes).
All text needs to be covered in a section. For this reason, after deleting a section, you may need to add a new section or refine an existing one to define text uncovered from the section deletion.
Resizing an Existing Sections
You may need to resize sections for a number of reasons. For example, in a multiple-page document, subsequent pages may not match the first page. To resize an existing section of your document, follow these steps:
-
Do one of the following to identify the section you want to change.
-
On the document preview, click the section you want to change.
-
In the Document Sections panel, click the listing of the section you want to change.
-
-
On the document, click on the top or the bottom edge of the section and hold your mouse button down. The cursor changes.
-
Drag the edge of the section to place you want.
-
Release your mouse button.
-
Click away on another part of the screen. A confirmation dialog displays.
-
To keep the change you made, select To abandon the change, select No.