There are four methods for populating Conexiom Express fields: Manually Entering Data, Double-Clicking, Moving to the Right, and Copying and Pasting. Additionally, this article explains how to search for Address Data in the Address field.
In the panels on the right side of your screen, you can fill in most missing data with one of the following methods. The one exception is that the Sold-To ID and Trading Partner fields must be manually entered the first time a document is received from a new trading partner in Express. Once entered, the system will remember these values for future documents from that trading partner. (For more details, see Sold-To ID and Trading Partner Fields in Express).
All methods for populating fields—including manual data entry—now help Conexiom learn information about this customer for future documents.
Note: All fields in Conexiom Express are predicted by AI, including standard and user-defined fields, regardless of how the data is entered.
Manually Entering Data
You can manually enter the data directly into the field on the right.
Manually entered data now also contributes to Conexiom’s AI learning for future documents.
-
Click on the field to locate your cursor within it.
-
Manually enter the data in the field.
Double-Clicking
Double-Click Fields
-
Locate the field in the document.
-
Double-click the field you want to copy.
-
In the right-hand panel, find the matching field.
-
Double-click the matching field.
-
The information is copied automatically.
Double-Click Column Headers
-
Locate the column in the document.
-
Double-click the header of the column you want to copy.
-
In the right-hand panel, find the matching field.
-
Double-click the matching field.
-
The information is copied.
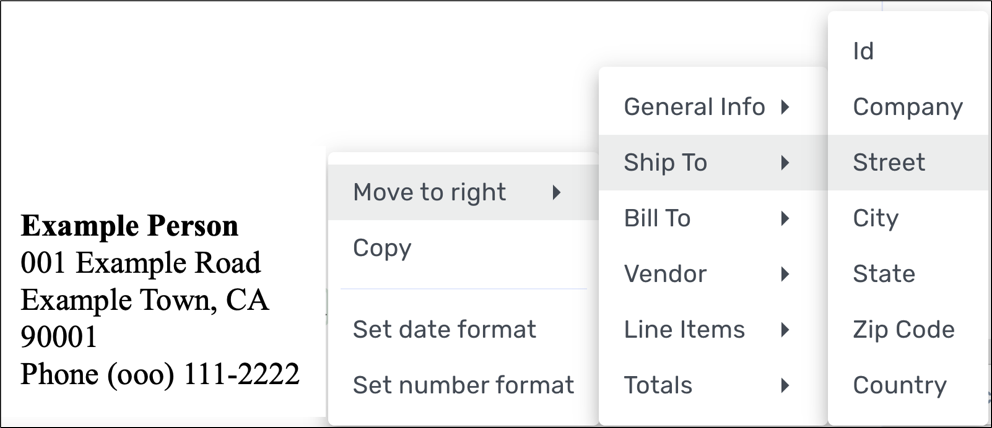
Moving to the Right
-
Click the field on the left showing the data that should be shared with the field on the right. A menu displays.
-
Click Move to right.
-
Make selections from the successive menus that open. These menus allow you to navigate to the name of the field on the right that requires the data. When you select the name of that field from the menu, the data is transferred.
Copying Multiple Lines (“Multi-Copy”) of Line Items
Copy text to multiple line item cells when multiple lines are selected using the Move-to-Right context sub-menu Multi-line Copy option.

-
Click your mouse button and hold it down, dragging it to lasso the fields on the left that show the data you want to copy to line items on the right. A menu displays.
-
Click Multi-line copy.
-
From the menu, select the description of the information you want to copy. For example, select Description Info. The data copies to the target.
Copying and Pasting
-
Do one of these actions to identify the text that you want to share with the corresponding field on the right:
-
Click the field on the left that shows the data. A menu displays.
-
Highlight some or all of the data within a field or in multiple fields that adjoin. A menu displays.
Note: When highlighting across multiple fields, begin at the left-most field and proceed to subsequent fields. -
To capture data from multiple fields, highlight some or all of the data in one field and then swiping your cursor to the right, highlight data subsequent fields. A menu displays.
-
-
From the menu that displays, click Copy.
-
In the field on the right side of your screen that is missing the data, right-click your mouse and from the menu that displays, select Paste (or use the keyboard shortcut Control + V) to place the data in the field.
Date and Number Format and Language Correction
When dates or numbers are not consistent in a document, with different formats or languages populating some fields, Express now provides a way to copy the correct language and formatting into that cell.
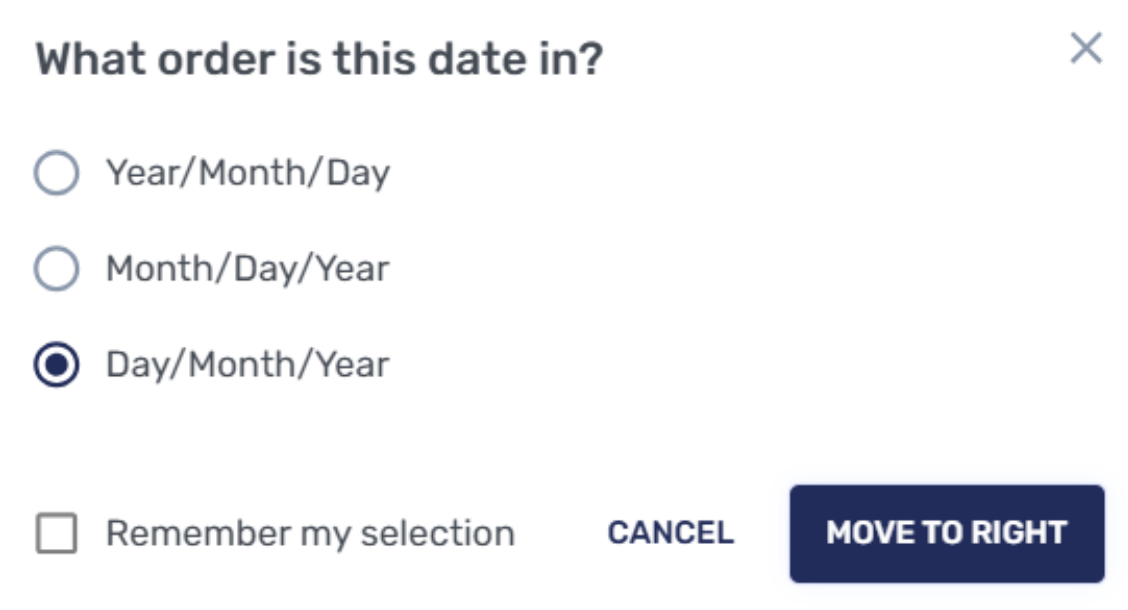
For example, dates can be formatted as MM/DD/YYYY, DD/MM/YYYY, or YYYY/MM/DD, in many different languages. When a date is selected, the system provides a dialog box from which to select the correct format. The date then displays in the selected format and language of the user’s view.
This feature helps provide quick review and submission of documents to your ERP system. For more information, .
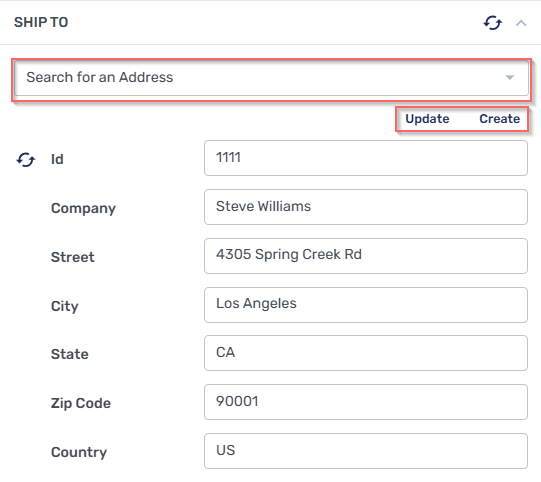
Searching for, Creating, and Updating Address Data
When supplying Ship To or Bill To address data, you can search for existing addresses, create new entries, or update existing ones.
-
Open the Ship To or Bill To panel on the right-hand side.
-
At the top of the panel, click Search for an Address.
-
The system searches addresses available in your source (for example, the Address table or a custom cross‑reference).
-
If an existing address is available, select it from the list.
Creating a New Address
-
If the address does not exist, select Create at the bottom of the search dropdown.
-
Enter the required address details.
-
The new address is saved to your source for future use.
Updating an Existing Address
-
If you modify any fields for an existing address, an Update button appears.
-
Select Update to save your changes.
-
Updates are saved back to the source (Address table or custom cross‑reference).