Exception Manager is an add-on application that allows Users to validate data and resolve exceptions within the Conexiom portal. If your organization does not have Exception Manager, it's likely these actions are completed within your ERP system.
The links below can be used to navigate to different sections within this article.
- Using Color Coding to Identify Issues
- View Enlarged Document
- Using Screen Management Features
- Using the Document Status Button and Tools Menu
- Actions in the Menu Bar
Using Color Coding to Identify Issues
In Exception Manager, some parts of the document are color coded to visually indicate the state of completeness that the field is in.
.png?width=688&height=454&name=151ab2%20Exceptions%20Manager%20(1).png)
-
Fields in green indicate validation rules have passed: no intervention is required
-
Fields in blue indicate it the field was populated with data from an API or a cross-reference table
-
Fields in red indicate a validation rule has failed and requires your intervention.
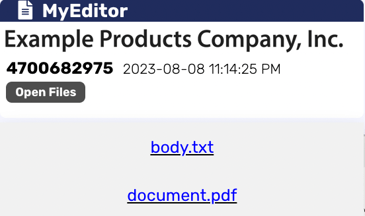
View Enlarged Document
The original document, pictured in the left panel of your screen, can be enlarged in another screen for easier viewing.
-
In the small section above the left panel, click Open Files. A menu displays.
-
Select the format in which you would like to view the document. (Choices vary, depending on the original format). An enlarged rendering of the document displays, covering the entire browser window.
-
When finished viewing, click the “X” in the tab at the top of the browser window to close the document and return to the Exceptions Manager
Using Screen Management Features: Zoom, Hand Tool, and Toggle
A number of features that can help addressing the document. They include Zoom, Rotate, Hand Tool, and Settings.
-
Change the Zoom level anytime by moving the pin on the Zoom bar. This enlarges the details of the document in the panel on the left.
-
Click one of the directional Rotate icons to Rotate the document in that direction ninety or one hundred and eighty degrees.
-
To move the document within the panel, the Hand Tool allows you to shift the document within the left panel. This feature is particularly useful when the document is zoomed in to a higher level of detail.
There are more ways to work with the screen to provide space:
-
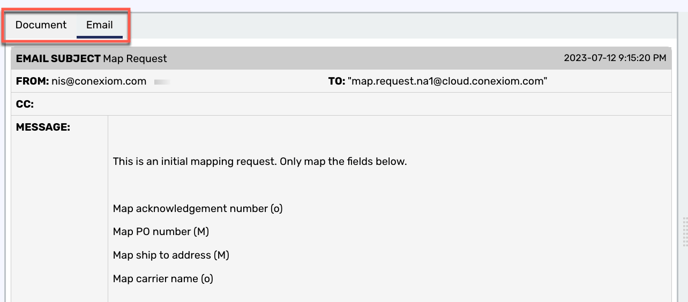
When the Exceptions Manager opens, the Document tab above the left panel is active. It allows you to view the digital copy of the original document. Click the Email tab next to it to view information from the email submission.
-
Click Collapse Left Panel in the lower left corner to hide the left panel and create more space on the right.
-
To view the output after changes, above the right panel, click the Output tab at the top of the right side of the Header. This view renders actual output as opposed to the raw data of the Edit Tab. This is where you do a final review before approving the document.
-
In the Header, in the far upper right, click the white Arrow icon to hide the Header or to expose it.
There are more ways to work with the screen to provide space:
-
In the Header, click the Arrow icons on the far right to collapse the Ship To and Bill To areas of the screen.
-
Partially collapse the left panel to create more space on the right.
-
On the right of the heading area, there is a description field (directly below the Document Status and Tools buttons) that provides validation information on the field that is activated in the main body of the right side.
In the center of the header, find the Field Locator and Editor. From this feature, you can use arrow keys to click through different fields to easily.
Using the Document Status Button and the Tools Menu
In the upper-right corner of the screen, click the Document Status to clearly see whether the document is valid by its display of either a red-X icon or a green-checkmark icon. Click the Tools icon to set options for screen management tools.

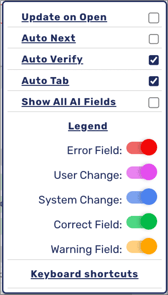
Tools Menu
Along with tabs, there are a variety of screen management and color-coding tools. help you to evaluate the document differently. To access them, in the upper right corner of the screen, click the Tools icon. The Tools menu displays. Descriptions of each tool follow in the table below.
|
Control Panel |
Control |
Meaning |
 Tools Menu
|
Update on Open |
Check to update document upon opening |
|
Auto Next |
Check to automatically move through all unresolved alerts in your current alerts list without needing to return to the Alerts Screen. |
|
|
Auto Verify |
Check to automatically Exception Manager document. |
|
|
Auto Approve |
Check to have all documents that pass all active document status checks be automatically approved. |
|
|
Error Field |
Highlight field(s) in red containing an error: Slide right to activate feature |
|
|
User Change |
Highlight field(s) in gray changed by a user: Slide right to activate feature |
|
|
System Change |
Highlight field(s) in blue changed by logic/rules: Slide right to activate feature |
|
|
Correct Field |
Highlight field(s) in green that are correct: Slide right to activate feature |
|
|
Warning Field |
Highlight field(s) in yellow containing a warning: Slide right to activate feature. |
|
|
Keyboard Shortcuts |
Opens a dialog that lists all of the available keyboard shortcuts |
Actions in the Menu Bar
At the bottom of the Document Entry Screen, you will find a menu from which to do a number of actions. Most of the decisions related to finishing your work with this document, whether to approve it or to assign it someone else. To expand the number of menu items, click the Hamburger icon.
-
Select from the following menu items and make the appropriate choices when prompted by the dialog box that displays.
|
Option |
Action |
|
Verify |
Use Verify to re-trigger any validations, this useful if you have manually input any information and the auto-verify feature is not on the tools menu. |
|
Update |
Use Update to return any values from your API or Cross Reference table look ups. This also triggers the Verify function |
|
Approve |
Click Approve to process the order. (See also Approving a Document). |
|
Request Change |
Click Request Change to open the change request pop-up, where you can submit your request for any necessary changes. (See HERE for more information on change requests.) |
|
Do Not Process |
Click Do Not Process if you do not want to process the document or want to process it manually. Document status will then be “Not Processed.” |
|
Forward for Approval |
When configured, click Forward for Approval to send the alert to another user for review and approval. |
|
Reset |
Click Reset to reverse all changes made and return to the original Alert information. |
|
Close |
Click Close to close the Alerts page. |
|
X |
Click X to shrink the menu. |