
Setup fields to configure naming details, whether the field is mandatory, and whether the field data displays in your Conexiom applications, Express and Configuration Studio.
Field Settings configure the names of fields, whether fields are mandatory, and whether a field displays in the Conexiom applications, Express and Configuration Studio. These fields can be used with any trading partner.
Note: You can also see these fields in the Transformations section.
Accessing Field Setup
To continue to integrate your system with the ERP of your choice, follow these instructions:
-
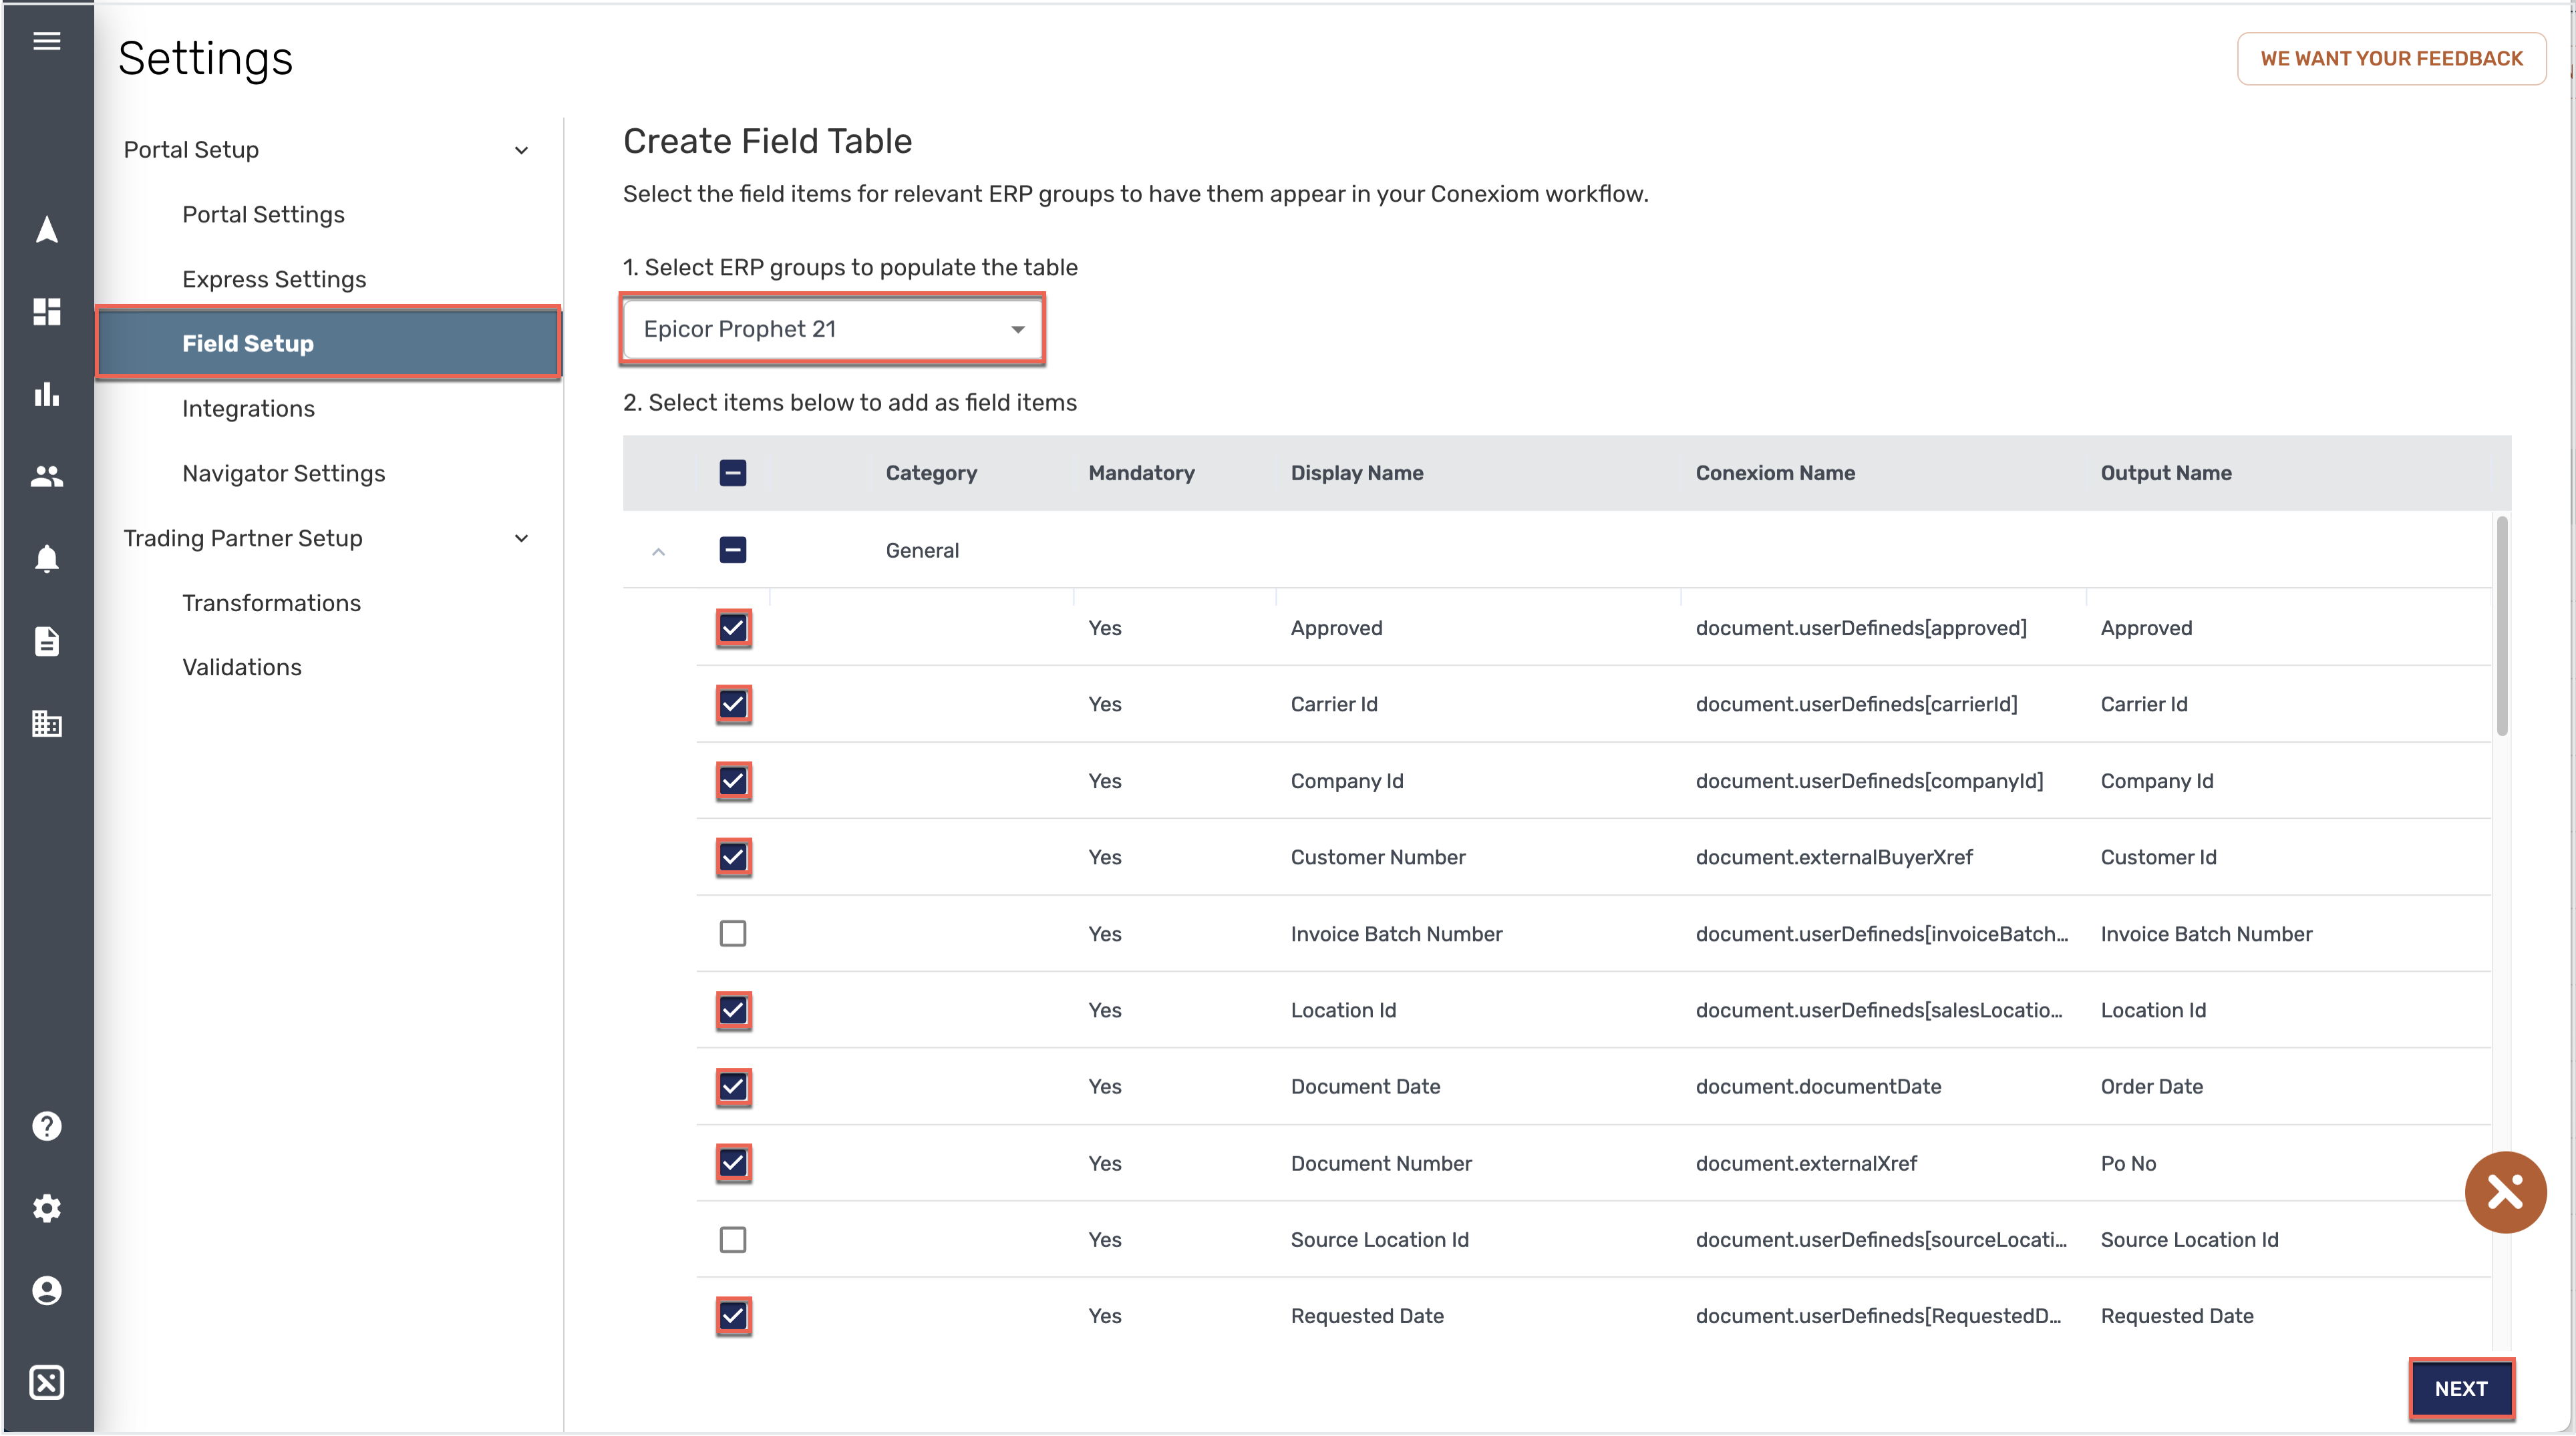
From the menu at the left of your screen, click the Settings (Gear) icon. The Settings page displays.
-
At the left side of the Settings screen, click the Field Setup sub-tab. The Create Field Table page displays. (See above).
-
From the ERP Group field, select the ERP. Groups of listings display in the table below, including the group General, the group Product Listing, and others, depending on the ERP.
Note: Listings groups vary, depending on the ERP. -
Click the arrow next to the group name you want in order to display the list of its fields.
-
Click the checkbox next to the listing within the group to display or configure that particular field for Express and Configuration Studio. Click the checkbox in the heading to display all of that ERP’s fields.
-
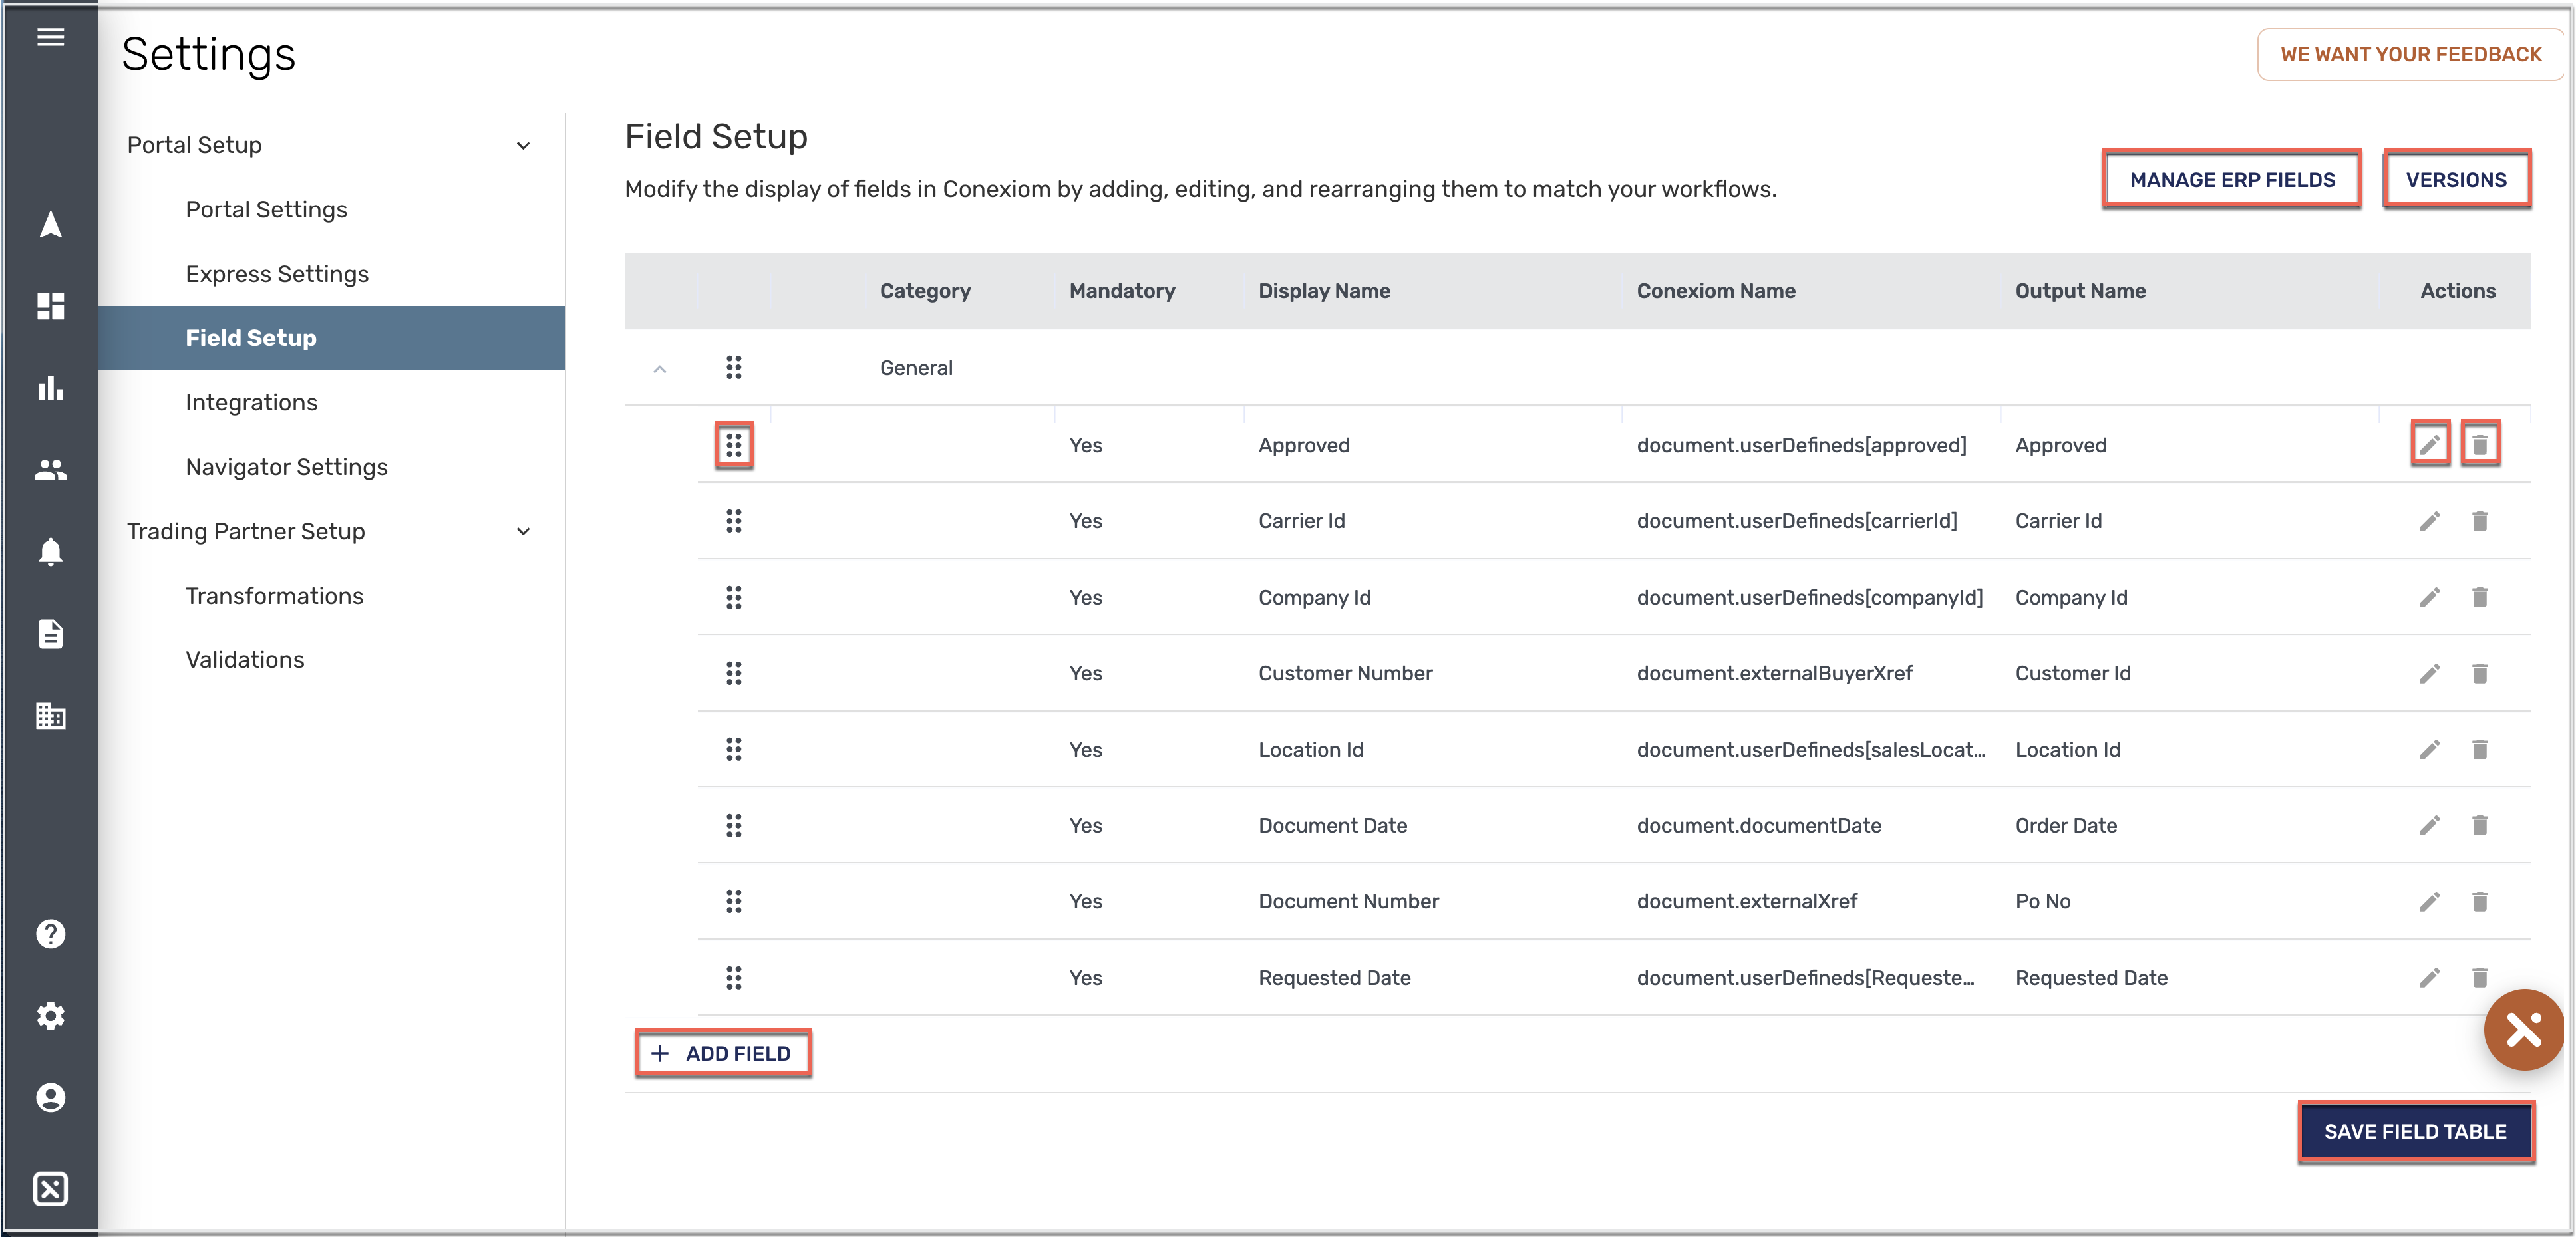
Click Next. The Field Setup page displays. (See below)
-
If you only want to display the fields you checked above, without modifying them, click Save Field Table. The fields will now display in the Express and Configuration Studio applications.
-
To return to the Create Field Setup page where you can add or remove fields, click Manage ERP Fields. The Create Field Table page displays.
Adding a Field to Configure its Name, Requirement and Menu Display
To add a field, follow these steps:
-
From landing on the the Create Field Table page, click Next. The Field Setup page displays.
-
Click +Add Field. The Add New Field Dialog displays. (See below)
-
Click on each field and then enter or select appropriate information from the dropdown menu.
Note: The application may supply some entries. -
Select the appropriate radio button to indicate whether the field is to be Required, (which will be listed in the “Mandatory” column of the Field Setup page).
Note: When processing, if a required field contains insufficient or incorrect data, the system produces an error. -
Select whether the field will display in a Text Field, in a Static Dropdown menu, (meaning the choices on the menu don't change, regardless of circumstance), or a Dynamic Dropdown menu, (meaning that, depending on the circumstance, the choices on the menu change).
-
Click Add Field. The Field Setup page again displays, now with a listing of the field you added. If hidden within a group, click the arrow at the left of the Category listing.
-
To save your new addition, click Save Field Table.
-
To return to the Create Field Setup page where you can add or remove fields, click Manage ERP Fields. The Create Field Table page displays.
Modifying an Existing Field’s Name, Requirement or Menu Display
To modify an existing field, follow these steps:
-
From the Create Field Table page, make sure that the checkbox that corresponds to the validation whose field you want to modify is checked. Otherwise it will not display appropriately.
-
Click Next. The Field Setup page displays.
-
Click the Edit Field (Pen) icon. The Edit Field Dialog displays.
Note: For reference, the Edit Field dialog box is nearly identical to the Add New Field dialog box pictured above, covering the same information. -
To change a field, click on it and then enter or select the appropriate information.
Note: The application may supply some entries. -
Select the appropriate radio button to indicate whether the field is to be Required.
Note: When processing, if a required field contains insufficient or incorrect data, the system produces an error. -
Select whether the field should display in a Text Field, in a Static Dropdown menu, (meaning the choices on the menu don't change, regardless of circumstance), or a Dynamic Dropdown menu, (meaning that, depending on the circumstance, the choices on the menu change).
-
Select Save.
-
Select Save Field Table.
-
To return to the Create Field Setup page where you can add or remove fields, click Manage ERP Fields. The Create Field Table page displays.
Changing the Order of Fields
On the Field Setup page, you can change order of the listings, thereby changing the relative order of when the listings are processed. To change the order, follow these steps.
-
From the Create Field Table page, click Next. The Field Setup page displays.
-
Click and hold the Handling (six dots) icon next to listing that you want to move up or down in the list.
-
Drag the listing up or down to the location you want.
-
Release your mouse button at the correct location. The listing remains in the new order.
-
Select Save Field Table.
-
To return to the Create Field Setup page where you can add or remove fields, click Manage ERP Fields. The Create Field Table page displays.
Returning to a Previous Version of the Field Setup Page
After making changes, if you want to return to a previous version of the Field Setup page, you can quickly select that previous version. For example if you have introduced changes you no longer want, you can select a previous set of configurations. To do so, follow these steps:
-
In the upper right-hand corner of the screen, click Versions. The Versions dialog box displays.
-
Click the radio button next to the date and time that represents the version you want to return to.
-
Click Restore. The version of the Field Setup Page you selected is restored.
Managing ERP Fields from the Create Field Setup Page
To return to the Create Field Setup page where you can add or remove fields, click Manage ERP Fields. The Create Field Table page displays.