
End by end instructions to connect Conexiom to Salesforce.
Upload Config File
-
Check that the.yaml file has the accurate Consumer Key & Consumer Secret. These 2 values should be the same as what was sent to Conexiom Support.
-
If Conexiom Support provided and Environment parameter, proceed to step 1.1, otherwise, proceed to step 2:
-
Navigate to Setup > Custom Code > Custom Settings > “Conexiom Settings” and click ‘manage.’ Populate the Environment field with the value provided by Conexiom HelpDesk.
-
-
Open the Conexiom app from the App Launcher and navigate to the Conexiom Admin tab
-
From the OAuth Setup section, upload or drop the installation file received from Conexiom helpdesk
-
Upon clicking the “Upload” button or dropping a file, the system will check if a prior configuration of Conexiom to Salesforce exists.
-
If a prior configuration exists, a dialog box pops-up appears - “This action will overwrite existing configuration. Would you like to proceed? (Yes/No)”
-
Select “No” to cancel the upload
-
Select “Yes” to proceed with the upload
-
-
-
Once the installation process has completed, a confirmation message will appear with a link to establish your SSO connection: “Configuration successful. Click here to connect to Conexiom.”
-
Click the here link in the message, this will navigate you to a Conexiom login page.
-
Select the Sign In with Salesforce option.
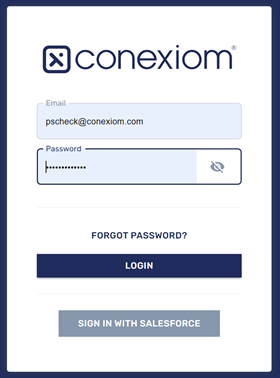
-
You will now be logged into Conexiom - please make sure that you have a role of “Super User” in the Conexiom Portal. Otherwise, you cannot see all of the records from the Portal on Salesforce. You can now continue with the remaining setup steps.
Update the Page Layout for Case
Add the alert component to any Lightning Pages where your users view alerts in cases, including the Conexiom Lightning App. Using the Lightning App builder, add the Custom Managed component named caseAlertContainer.
The container is designed for a larger area, so we recommend either full width or 2/3 width per the example below:
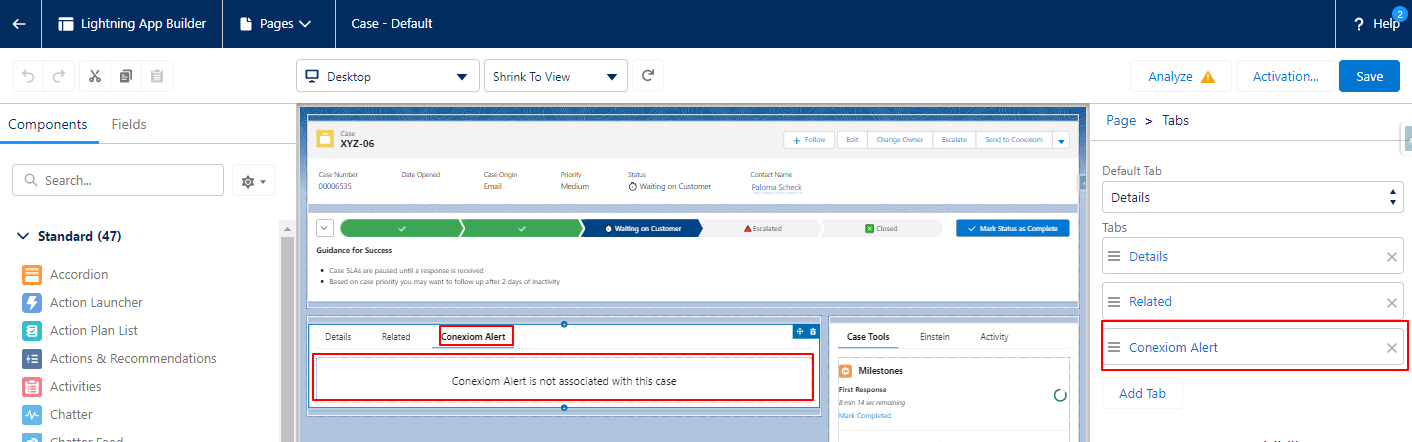
Use the following links for guidance on how to use the Lightning App Builder:
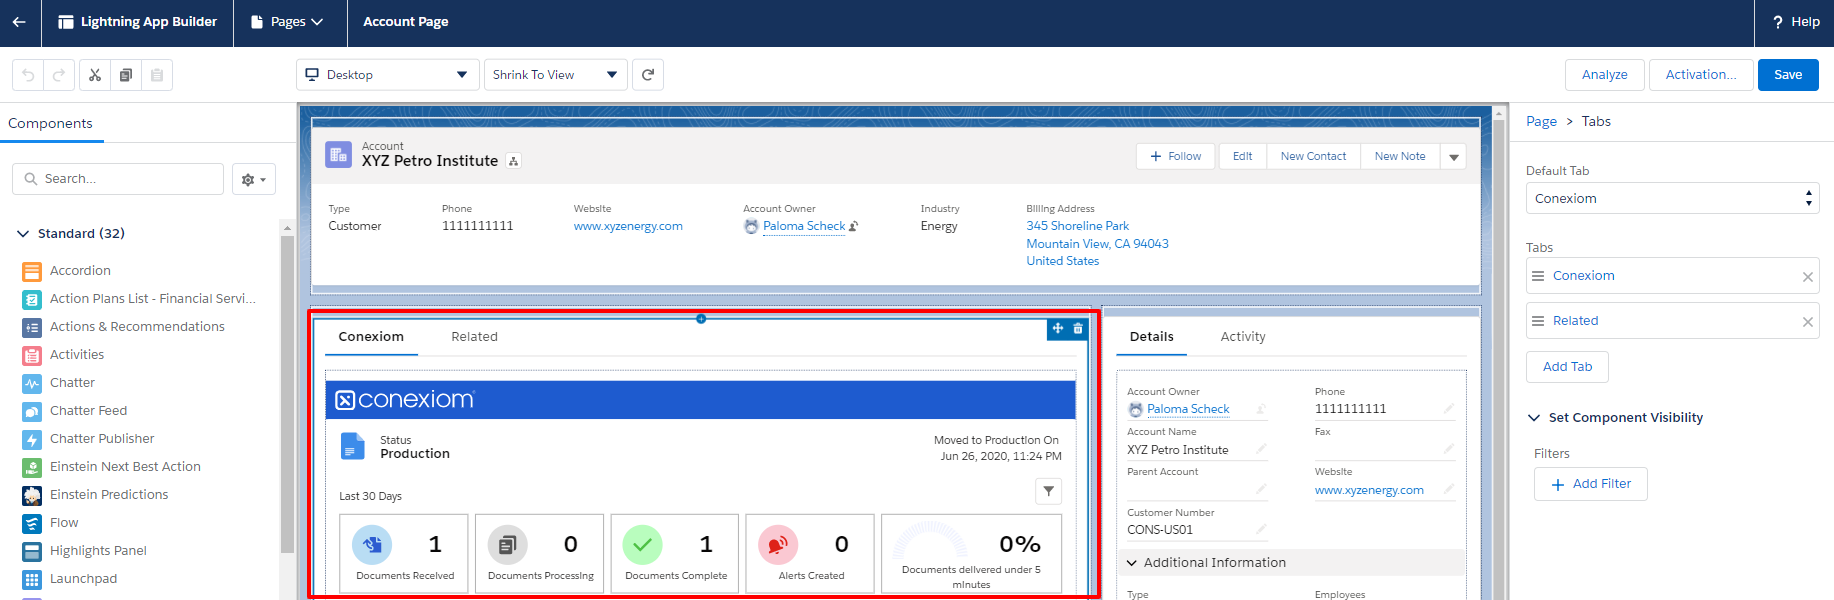
Update the Page Layout for Account
The majority of Conexiom data that users interact with in Salesforce is stored in the Conexiom Partner Portal. The data is displayed in a component which you must add to the Account Lightning Page which Conexiom users will use to interact with Conexiom. Resources on how to do this are included in this section.
Use the Lightning App builder to create or modify an existing Account Record Lightning Page to configure where your users view Conexiom customer information. Add the Custom Managed component named appContainer to this page.
The container is designed for a larger area, so we recommend either full width or 2/3 width per the example below:
Configuring Data Stored in Account Object
There are some fields in Salesforce that the application interacts with. This section guides you through fields on the account object.
There are a few fields created by the application that are stored in Salesforce and play an important role in the proper functioning of the application. Those fields are covered below.[PS9]
|
Custom Field Name |
Description |
Recommended Settings |
|
cnxm__ConexiomId__c |
An Id unique to each Conexiom customer used for making API calls. This value does not have a business application and is only used by system processes. |
|
|
cnxm__CustomerNumber__c |
In Conexiom, the customer number field is required and must be unique for each customer. The Conexiom Customer Number needs to be mapped to the unique identifier in Salesforce that matches this number. If you already use another field in Salesforce to store this value, you may continue to use that field. If you do not store this value on the account in Salesforce, use this field. |
|
|
cnxm_ConexiomStatus__c |
This field is updated with the Conexiom Status, we store this data on the Account Page to provide this visibility from Salesforce list views and reports. |
|
Mapping Conexiom Data to Account Fields
If you are using a standard or custom field other than the one created by this application to store the customer number which is used by Conexiom, you must update the default mapping settings. If you do not have a field that serves this purpose in Salesforce and plan to use the cnxm__CustomerNumber__c field, you may skip this step, as this field is mapped by default.
In addition, you can change the mapping of address fields and Account Name from Salesforce to Conexiom, which are used to populate fields in Conexiom when creating a new customer record from a Salesforce account. By default the fields from BillingAddress and Name are used if left unchanged. The default mapping is below:
|
Label |
Salesforce Field API Name |
|
Account Customer Number |
cnxm_CustomerNumber__c |
|
Account City |
BillingCity |
|
Account Country |
BillingCountry |
|
Account Postal Code |
BillingPostalCode |
|
Account State |
BillingState |
|
Account Street |
BillingStreet |
|
Account Name |
Name |
|
Account Shipping City |
ShippingCity |
|
Account Shipping Country |
ShippingCountry |
|
Account Shipping Postal Code |
ShippingPostalCode |
|
Account Shipping State |
ShippingState |
|
Account Shipping Street |
ShippingStreet |
Note: In the Object Manager for the Account Object, you will only find BillingAddress and ShippingAddress instead of the fields listed above as these are compound fields.
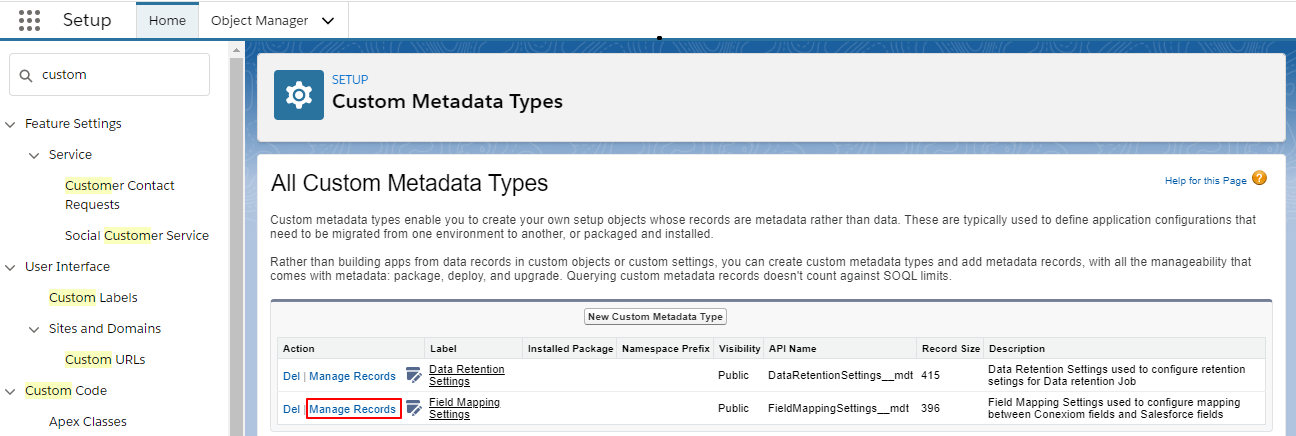
OPTIONAL: If you need to change the mapping of the Customer Number and any other account fields, follow these steps:
-
From the Setup Home page, enter Custom Metadata Types in the Quick Find box.
-
Select Custom Code > Custom Metadata Types.
-
Select Manage Records next to the Field Mapping Settings label.
-
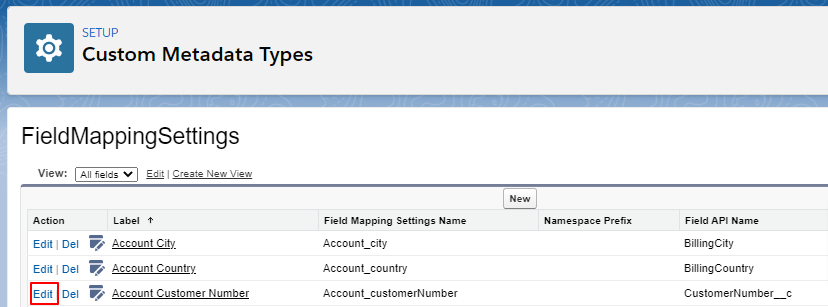
A list of fields available for mapping displays.
It is recommended to create a New View and ad the Field API Name to the list of fields displayed to see all mappings from the list view.
-
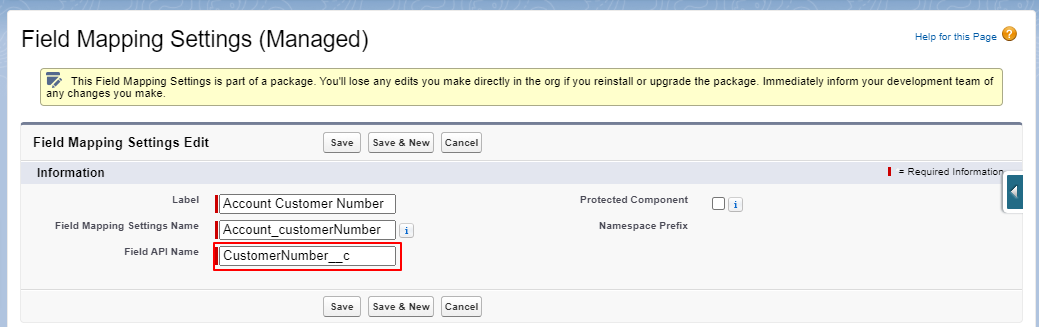
Locate the Account Customer Number row, click Edit.
-
In the Field API Name, enter the Field Name of the existing field you wish to use.
You must use a field that exists on the account object. Enter the Field API Name exactly as it appears (e.g. 'AccountNumber').
-
Click Save.
-
Follow steps 5-8 for any other fields on the account for which you wish to change the mapping.
Incident Log and Retention Settings
The application includes a log where unexpected events are recorded for troubleshooting. You can access this log from the Conexiom App navigation menu. The log does not require configuration by default; however, you may want to update the settings to avoid exceeding data storage limits.
Setting Data Deletion Schedule
To configure data retention settings for the log object, follow these steps:
-
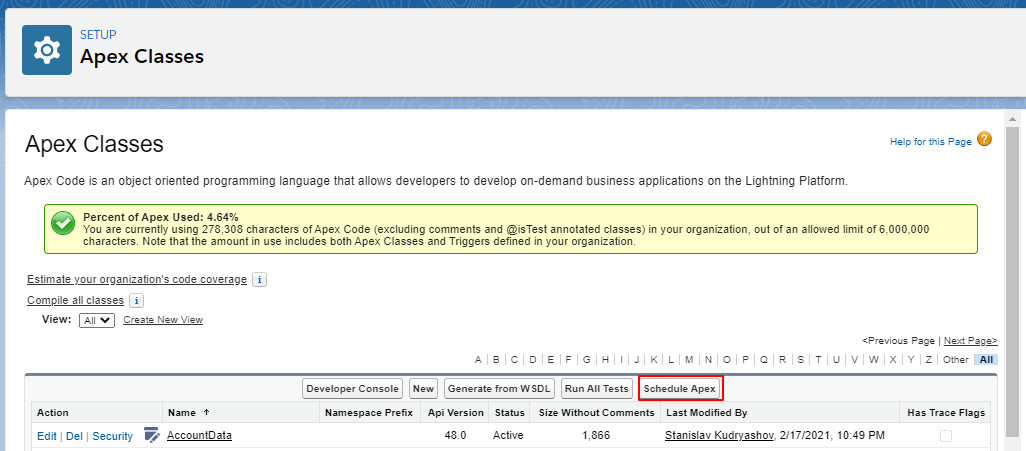
Navigate to the Setup Home page. Enter Apex Classes in the Quick Find box.
-
Select Custom Code > Apex Classes.
-
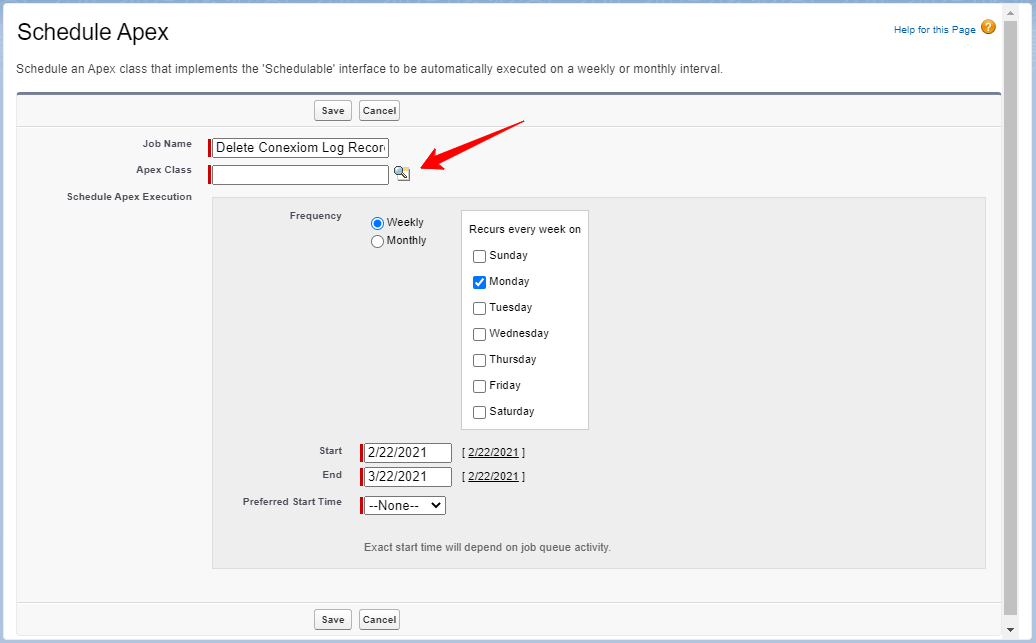
Click Schedule Apex.
-
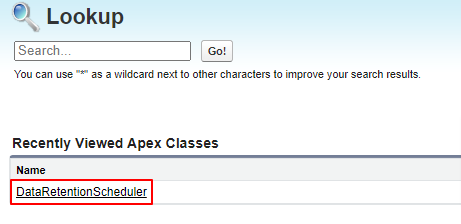
Next to Apex Class field click the lookup icon.
-
On the Lookup page, select DataRetentionScheduler (If the search results don't return the class, return to the list and find it in the list, click into the record, then return to step 2).
-
Select Frequency. Either Weekly or Monthly.
-
Select one or more days of the week or one day of the month for the job to recur
-
Select Start and End dates.
-
Select Preferred Start Time.
-
Click Save.
-
Navigate to the Setup Home page. Enter Custom Metadata Types in the Quick Find box.
-
Select Custom Code > Custom Metadata Types.
-
Select Data Retention Settings from the list view.
-
Click Manage DataRetentionSettings.
-
Click Edit for the AqLog item.
-
Update Retention Period (Days) if desired. Records are retained for the indicated number of days and are deleted in accordance with the job scheduled in steps 1-11.
-
Click Save.

Note: To manage and delete scheduled jobs, navigate to the Setup Home page and enter Scheduled Jobs in the Quick Find box. Select Environments > Jobs > Scheduled Jobs.