
Using global business-logic data transformations statements allow systematic alteration of data to match ERP requirements in all of your trading partners.
Data-transformation statements (business-logic statements) allow you to systematically alter data to match the requirements of your ERP across all of your trading partners. Here are few examples:
- Always Set the Ship-To Country to “US.”
- If the unit or measure is listed as “Case,” set it to “CS.”
- If the unit of measure is listed as a package, transform the listing to single units, changing the count of units to include how many pieces are in each package, and modify the unit price to correspond to the change.
You can set up data transformations to apply to only a single trading partner or you can set them up to apply to all of a customer’s trading partners. To create data transformations to apply to only a single trading partner, follow these steps:
- In the header of the Conexiom Premier screen, click the Gear icon to display the Settings page.
- On the left of the screen, click Trading Partner Setup and the Transformations sub-tab. Listings of data transformations display.
|
|

Creating Data Transformations
You can create or modify existing data transformations for individual trading partners. You can also choose whether the data transformation applies every time a document is processed by that trading partner or if the transformation should only be applied if its text meets a particular condition.
Data transformations can be simple or they can be elaborate. For example, a simple data transformation might change the word “Each” to “EA.” A more elaborate example of a data transformation would be if the unit of measure listed for package needs to be converted to single units, taking into account how many pieces are in the package. In that case, you would create a data-transformation statement that is comprised of these elements:
- If the Unit of Measure is a package, (“PKG”)
- Set the Unit of Measure from package to individual units, ("EA,” for “each”)
- Multiply the Quantity by 6, (given there are six units per package)
- Divide the Price by 6, (given there are six units per package so the price of each unit need to be one sixth of the package price)
Or, as it is expressed programmatically in the image below:
Line 1 / RED - If the Buyer UOM is Equal to PKG
Line 2 / GREEN - Set the Line Item - Buyer UOM to EA
Line 3 / YELLOW - Multiply the Line Item – Buyer UOM Quantity by 6
Line 4 / PURPLE - Divide the Line Item – Quantity Per Unit Price by 6
Note: Colors correspond to components in the demonstration image below; (they do not appear in the actual dialog box on your screen).

To modify a current data transformation, see Modifying Data Transformations, below. To create a new data transformation, follow these steps.

- Click Add Logic. Then Add Logic dialog displays.
- From the dialog box, click Create custom logic and then click Add Logic.
Creating Custom Logic
When you select Create Custom Logic, another dialog displays. 
|
Selection |
When to Use |
|
Always |
To run the logic for every document regardless of any other condition found. This applies to header level information where data should be the same with every document. Example: “Always Set the Ship-To Country to the US.” For instruction, go to Step 2. |
|
If |
Along with creating the data-transforming action, create a condition to trigger when the data transformation is run. Example: If the unit or measure is “Case,” (the trigger), set the unit or measure to the abbreviation “CS.” For instruction, skip Step 2 and go to Step 3. |
- Select whether the data transformation should be run Always, on every document, or only If a certain condition applies. Make a selection based on the table above.
- In Step 1, if you selected Always, follow these steps:
- Click the Action field directly below that radio button and from the drop-down menu that displays, select one of the actions. Depending on what you choose, different fields and menus display to the right of that Action field.
For example, if you wanted to create the transformation statement Always Set the Ship To Country to the US, in the first field, you would select Set from the drop-down menu. When you do, two more fields display. - Using each of the fields that display, create a statement to define the transformation by either selecting a choice from a drop-down menu or by entering information in with your keyboard.
To stay with the same example as in Step a, in the second field you would scroll until you found the heading Ship To Address and then select Country. Then in the third field, using your keyboard, you would enter in the letters “US.” As you enter letters, the application gives you the choice to add those letters as your selection.
- Click the Action field directly below that radio button and from the drop-down menu that displays, select one of the actions. Depending on what you choose, different fields and menus display to the right of that Action field.
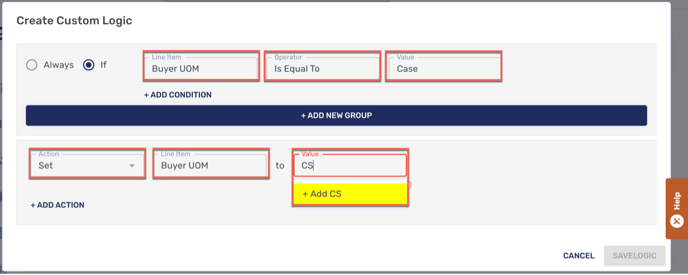
- In Step 1., if you selected If, two fields display directly to the right. These fields create a condition upon which to trigger an action. For example, if you wanted to create the transformation statement If the buyer’s unit of measure is “Case,” instead use the abbreviation “CS,” first you create the condition as an “If statement.” Then, you would finish the data transformation by defining the “action statement.”
To complete the condition and then the action, follow these steps:- Click the first field to select a value from the drop-down menu. Using the above example, scroll down to Line Items and select Buyer UOM.
- In the second field, click to select an Operator from the menu. Using the same example, you would select Is Equal To. At that point, another field displays, asking for another value.
- Using your keyboard, enter a value. Using the same example, you would enter the word “Case.” This completes the condition upon which the action is triggered.
Note: At this point, you can add another condition. To do so, click Add Condition. - Click on the Action field to display a drop-down menu and select an action. To continue with the example, you would select Set. Another field then displays to the right, asking for a Line Item.
- Click the field to display a drop-down menu and from it make a selection. For the example, again you would select Buyer UOM. Another field displays to the right, asking for a Value.
- Enter a value to define the action. For the example, using your keyboard, you would enter the letters “CS.” As you enter letters, the application gives you the choice to add those letters as your selection.
- To Add more actions, click Add Action. To Add a new group of actions, including conditions and actions, click Add New Group.
- When finished, click Save Logic.
Modifying a Data Transformation
You can edit any of the custom logic statements you see listed in the Added Logic Statements section. To modify a data transformation, follow these steps:
- Click the Edit icon, (Pencil), to the right of the data transformations in the listing. The Data Transformations dialog displays for that individual data transformation, with the information filled in to each field.
- Make the changes you want according to the instructions above, under Creating a Data Transformation.
- When you are finished, click Save Logic..
Changing the Order of a Data Transformation
When logic statements are not in the right order, you may not get the results you want because the action of one statement may depend on the action of another statement. In the Data Transformation listings, you can re-order when the Data Transformation run.
Warning: To avoid problems with new or existing Data Transformation, contact Conexiom for advice with this feature.
To change the order of a single statement, click the [six dots?] icon on the left side of the logic statement listing. Drag the data-transformation statement to change when it runs relative to the statements that precede or follow it.
You can move any statement as many times as you want to give it the right position in the order.
Changing the Order of a Data Transformation
When logic statements are not in the right order, you may not get the results you want because the action of one statement may depend on the action of another statement. In the Data Transformation listings, you can re-order when the Data Transformation run.
To avoid problems with new or existing Data Transformation, contact Conexiom for advice with this feature.
To change the order of a single statement, click the up or down Arrow icon on the left side of the logic statement listing to move it in the corresponding direction, changing when it runs relative to the statements that precede or follow it.
In the example below, the statement “Conexiom Default Processor” could be moved above or below the surrounding statements with one click. You can move any statement as many times as you want to give it the right position in the order.
Deleting Data Transformations
You can delete logic statements that you have added (custom or from template) that you see listed in the Added Logic Statements section.
Click the three dots (ellipses) to the right of the description field when the logic-statement listing you want to delete expanded.
From the menu that displays, click Delete.
The logic statement is deleted.
Possible Actions to Use in Data Transformations
Following are available actions you can take when creating transformations in Configuration Studio.
|
Add |
Remove Characters |
|
Add Days |
Remove Days |
|
Append Text |
Replace |
|
Combine |
Set |
|
Disable Address Lookup |
Set Field to Uppercase |
|
Divide |
Subtract |
|
Multiply |
Truncate |
|
Pre-pend Text |
Use Cross Reference |
|
Reject and Notify |
|
Possible Conditions to Use in Data Transformations
The following table lists conditions you can use as triggers in If statements, including definitions and examples.
|
Condition |
Description |
Example |
|
Contains |
Search a field for string of characters |
If the Buyer Part Number Contains “HNY,” then…. |
|
Ends with |
Select a field and check a string of characters at the end of the field’s captured value. |
If the Buyer Part Number Ends With “HNY,” then… |
|
Is greater than
|
Check if the value captured in a numeric field is greater than a set number. |
If the Document Total is greater than “$100,000.00,” then… |
|
Is greater than or equal to
|
Check if the value captured in a numeric field is greater than or equal to a set number. |
If the Document Total is greater than or equal to “$100,000.00,” then… |
|
Is not empty
|
Check if a field has a captured value. |
If the Ship Via is not empty, then… |
|
Is equal to
|
Check if the captured value is equal to either another captured value or a set string. |
If the Buyer UOM is equal to “EA,” then… |
|
Is not equal to
|
Check if the captured value is not equal to either another captured value or a set string. |
If the Buyer UOM is not equal to “EA,” then… |
|
Is empty
|
Check if a field has no captured value. |
If the Buyer UOM is empty, then…. |
|
Is less than
|
Check if the value captured in a numeric field is less than a set number. |
If the Document Total is less than “$100,000.00,” then… |
|
Is less than or equal to
|
Check if the value captured in a numeric field is less than or equal to a set number. |
If the Document Total is less than or equal to “$100,000.00,” then… |
|
Starts with
|
Select a field and check a string of characters at the start of the field value captured. |
If the Buyer Part Number starts with “HNY,” then…. |